The Alerts window provides a simple environment to define email and Simple Network Management Protocol (SNMP) trap alerts for the collector to notify you of significant events and provide you with performance metrics. The alerts can notify you of a problem or provide you with performance information to help you evaluate the health of your environment.
Alerts can be delivered as either email alerts via your email server or SNMP traps via your SNMP server. Before you can define the alerts, you must configure the settings for your email and/or SNMP server.
Describe the settings for your servers as follows:
Once you have described the email and/or SNMP server, you can Create a New Alert.
To enable email alerts, you must first configure the settings for a valid email server.
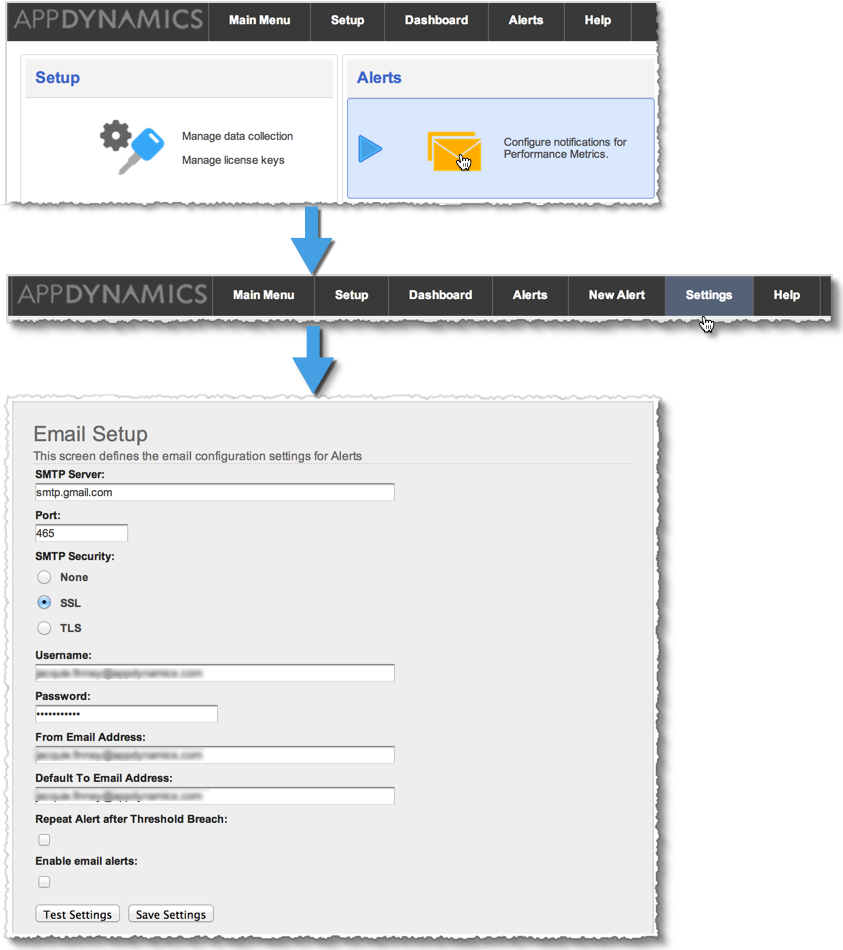
- From the Main Menu, click Alerts and then on the Alerts window, click Settings.
- The Email Setup window displays by default. In the Email Setup window, provide the following parameters:
- Email Server: Specify the hostname of the Email server.
- Port: Specify the port number of the server.
- SMTP Security: If applicable, specify the type of security used, SSL or TLS; otherwise, specify None.
- Username: If your server requires authentication, specify the user name AppDynamics uses to connect to the Email server; otherwise, leave this field blank.
- Password: If your server requires authentication, specify the password for the user account AppDynamics uses to connect to the Email server; otherwise, leave this field blank.
- From Email Address: The address which will send the alert email.
- Default To Email Address: The default recipient of the email alert.
- Request Alert after Threshold Breach: Check this box if you want to continue to receive alerts after the threshold has been reached until the situation has been remedied. When not selected you will receive an alert only when the threshold is first breached.
- Enable email alerts: Select if you want to receive email alerts when the threshold has been reached. You can specify the SNMP server but the alerts are not enabled until you click this box.
- Click Test Settings to verify the configuration.
If configured correctly, you will receive a test message via email. If the settings are faulty, an error message displays in red at the bottom of the window which will help diagnose the issue. - Click Save Settings to save your changes.
- Click Close to return to the Alerts window.
Note: You may have to refresh your browser before the UI recognizes that you have setup the email server.
To enable SNMP alerts, you must first configure the settings for a valid SNMP server.
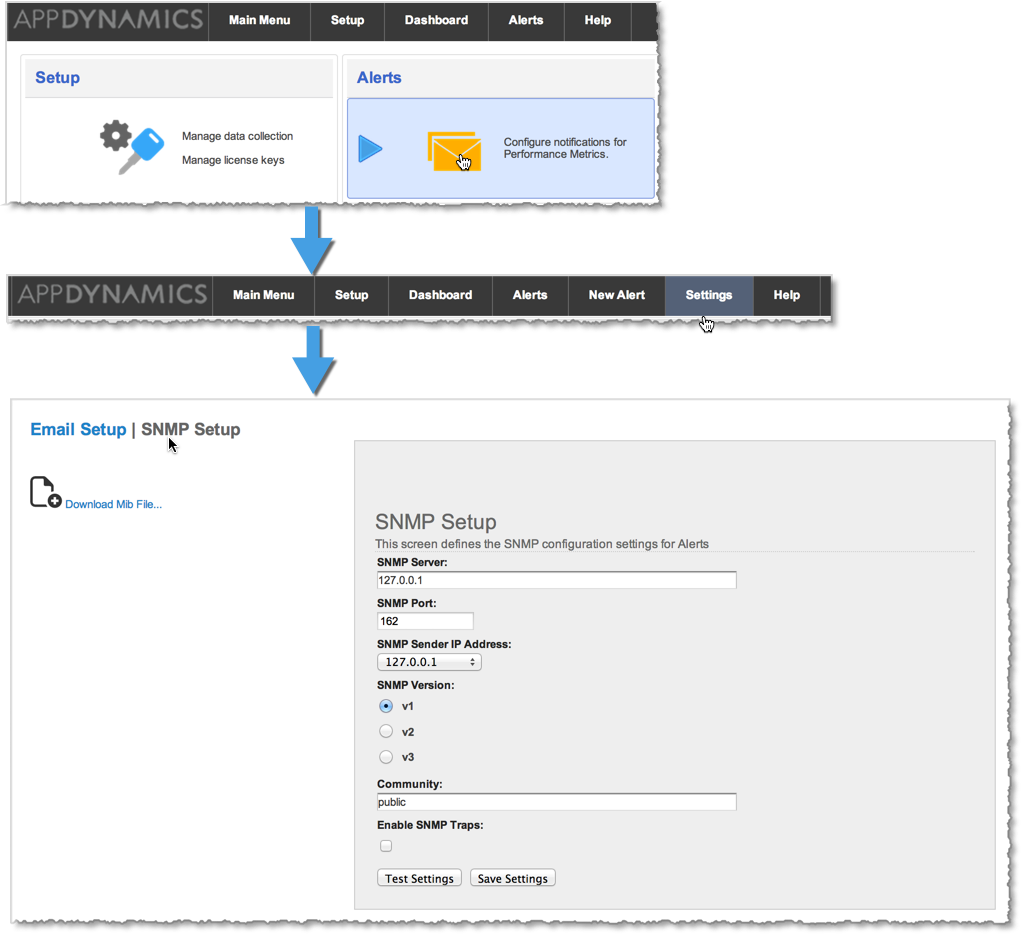
- From the Main Menu, click Alerts and then on the Alerts window, click Settings.
- On the setup window that appears, click SNMP Setup and then provide the following parameters:
- SNMP Server: Enter the server name or IP address for the SNMP server used for receiving traps.
- SNMP Port: Enter the port number used by the SNMP receiver on your SNMP server.
- SNMP Sender IP: Select the IP address for the SNMP trap sender. The contents of this list correspond to the IP addresses of the network interface cards installed in the machine hosting AppDynamics for Databases. Select the fixed IP address that corresponds to the hostname specified in URL when accessing the UI.
- SNMP Version: Click the version of SNMP your server uses. If you choose this option v3, the dialog expands and you will see more options:
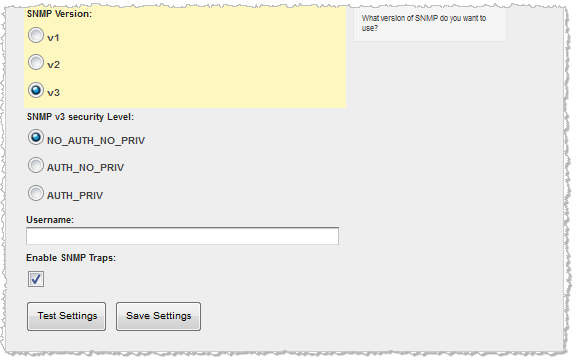
- SNMP v3 security Level: Choose the security level required on your v3 SNMP server. Depending on which level you choose, there are other options available:
- NO_AUTH_NO_PRIV: For this level of security you must specify only your user name.
- AUTH_NO_PRIV: For this level of security you must specify your user name and password, and the authentication protocol (MD5 or SHA) used.
- AUTH_PRIV: For this level of security you must specify your user name and password, the authentication protocol (MD5 or SHA) used, and the privacy protocol (DES, 3DES. AES128, AES192).
- Community: Enter the community string required to authenticate messages that are sent between the collector and your SNMP server. The community string is like a user ID or password.
- Enable SNMP Traps: Select to enable sending SNMP trap alerts when the threshold has been reached. You can specify the SNMP server but the alerts are not enable until you click this box.
Click Test Settings to verify the configuration.
If configured correctly, an SNMP trap is sent to the SNMP server. If the settings are faulty, an error message displays in red at the bottom of the window which will help diagnose the issue.
Click Save Settings to save your changes.
Click Close to return to the Alerts window.
The Management Information Base (Mib) file is the SNMP trap definition. When you click Download Mib File..., the contents of the AppD4DB-MIB.mib file displays. Copy the contents of the display and install it on the SNMP trap receiver product. See your documentation for the SNMP receiver for information on how to install the contents of this file.
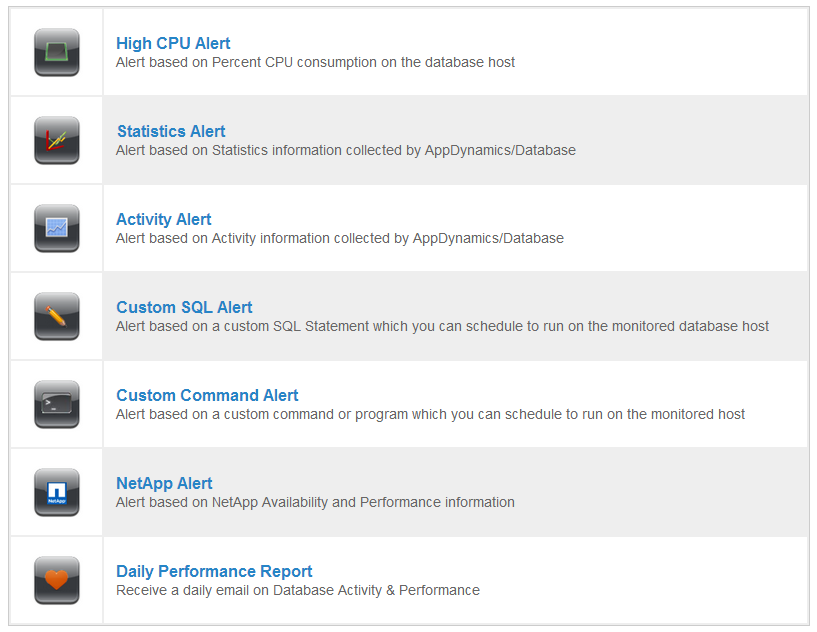
At the top right of the Alerts Window, click New Alert from the top menu and from the list that appears, choose an alert type.
The successfully created alert runs on the predefined schedule.
For more information on configuring alerts, see the following topics:
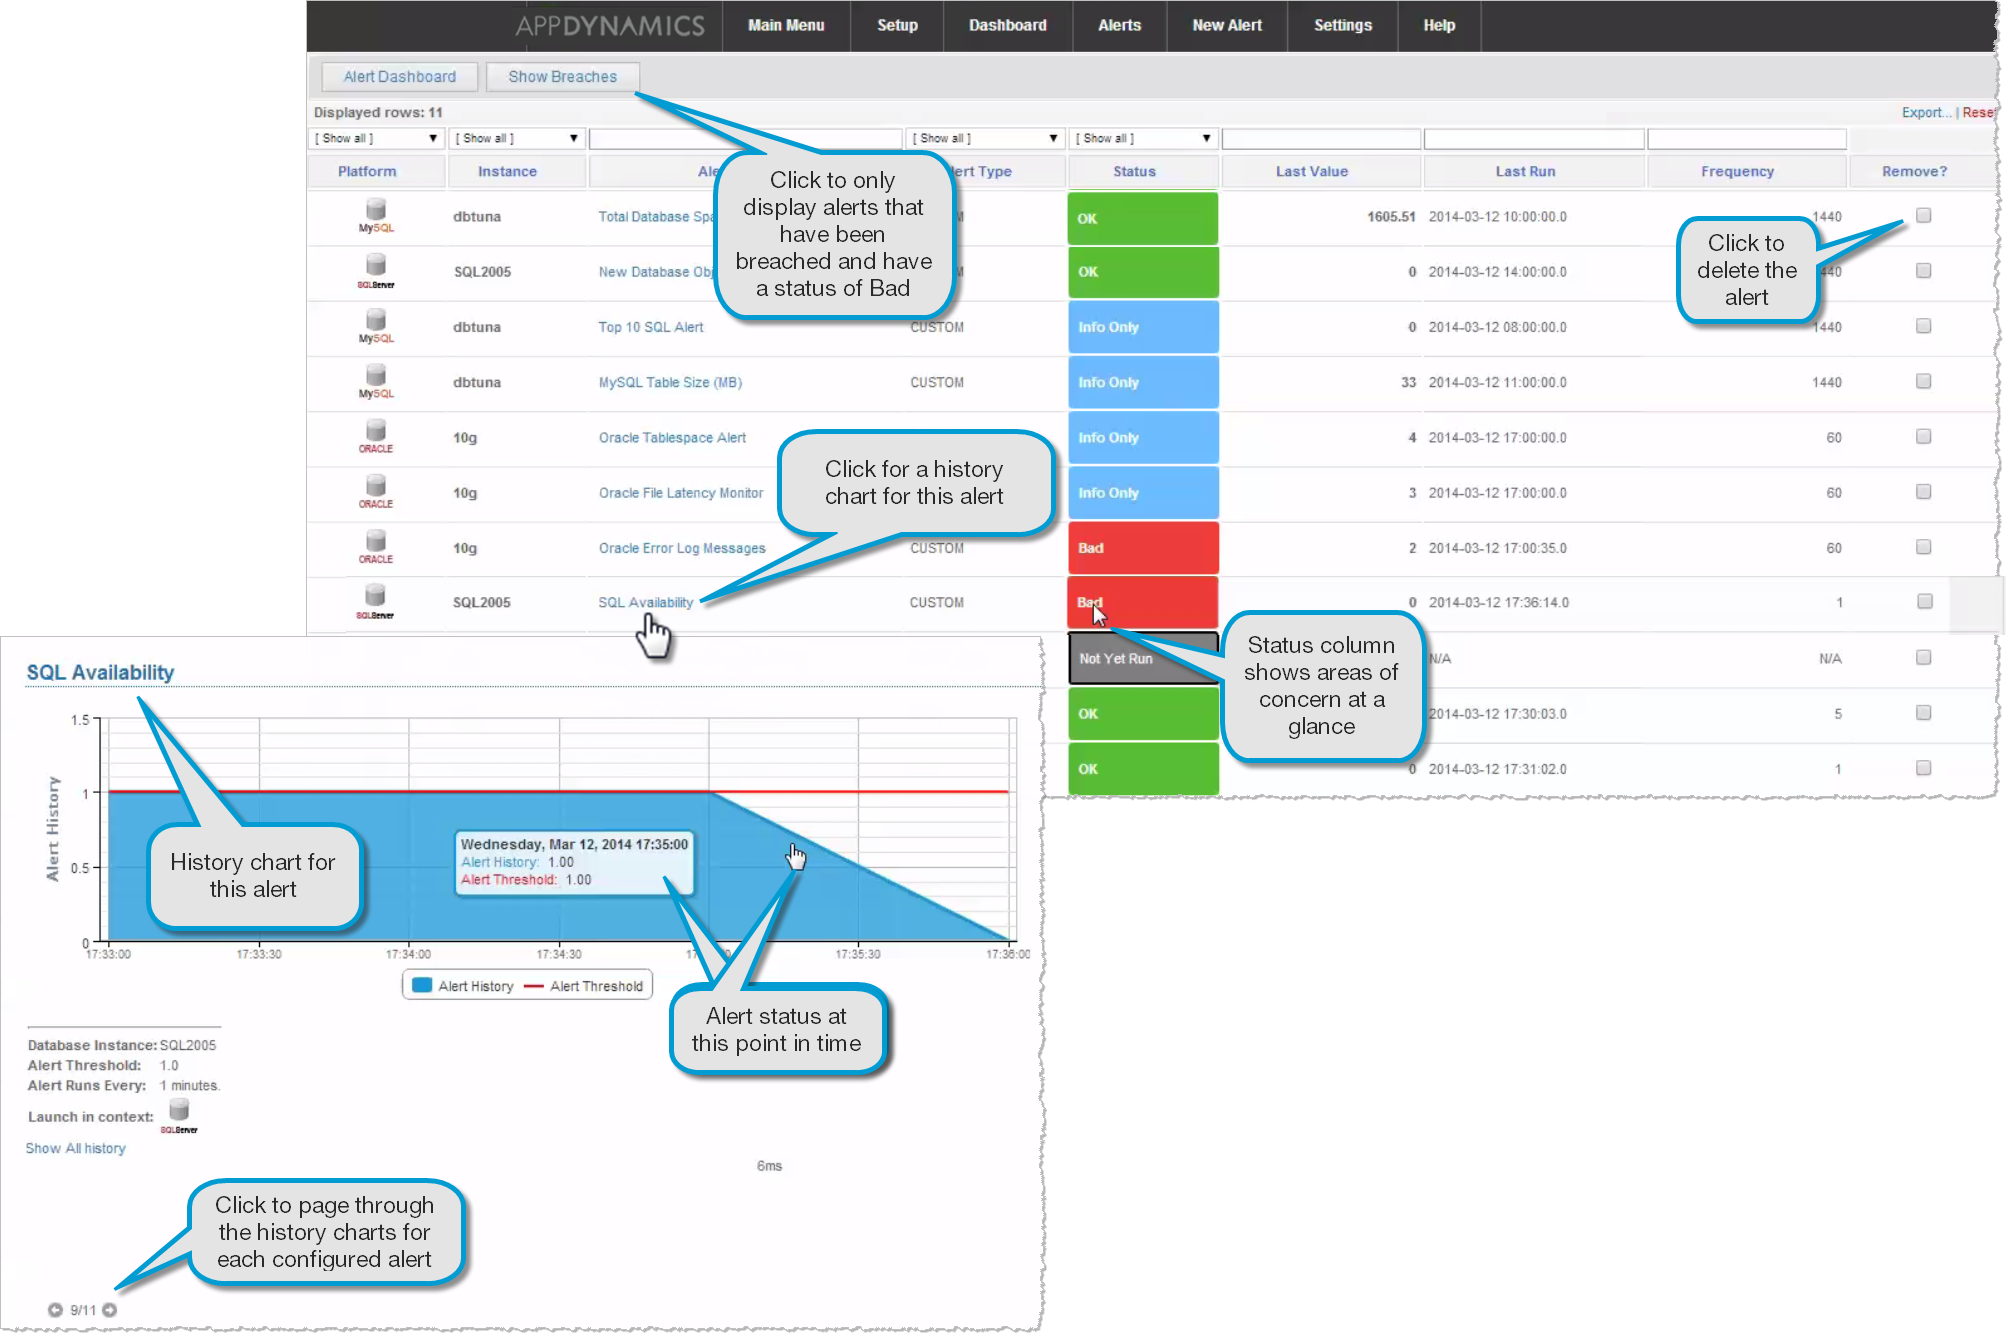
The Alerts Dashboard lets you see at a glance if any of the alerts you have configured have been breached.
- To see a history chart for the alert, click the alert name.
To page through the history charts for all your alerts, click the forward or backward arrow at the bottom left of the alert history chart window. - To view only breached alerts, click Show Breaches.
- To delete an alert, click the Remove checkbox for the relevant alert.