Download PDF
Download page Configure Synthetic Jobs.
Configure Synthetic Jobs
Related Pages:
Specify your Test
Synthetic Jobs use either a specific URL or webdriver script to test one or more web pages. If your site requires authentication, you must create a script that performs the authentication to log onto your site. See Synthetic Scripts for more information.
To use a URL:
- Select "Measure a URL".
- In the URL field, enter a site or page URL.
- In the Name field, enter a name for the job. This name appears in the Jobs list in the Controller UI.

To use a webdriver script:
- Select "Run a Script".
- Select Python 3 or Python 2.

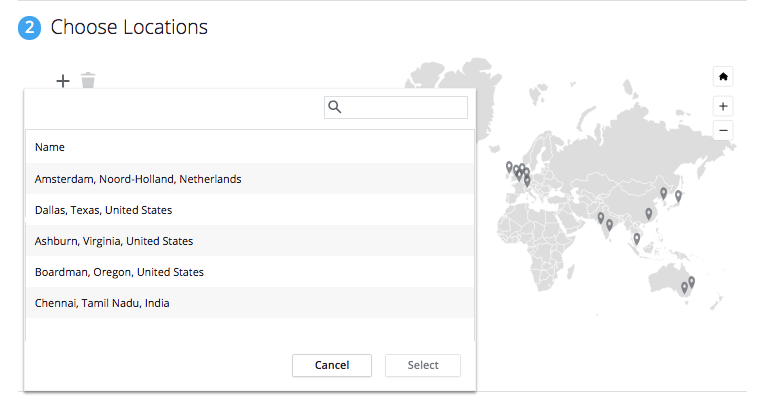
Choose Locations
You can choose one or more locations in which the job runs. This can also be configured to test all of the locations every time or one location each time the job runs. For a complete list of Synthetic Agent locations, see Synthetic Agent Locations.
Hosted Agent Locations and Synthetic Private Locations
If you have deployed a Install the Private Synthetic Agent (Web and API Monitoring), you can choose from Hosted Agent Locations or Private Agent Locations. The Hosted Agent Locations are where AppDynamics hosts public synthetic agents. The Private Agent Locations are where you are hosting your synthetic private agents.


Schedule Jobs
The multiple schedules feature is supported only in SaaS Controllers 22.2.0 and later versions.
When you create or edit your job, you can define the job schedule.
You can create multiple schedules for the same job. Each schedule can have its own time zone, frequency, and execution interval. This allows you to execute the job in different frequencies:
| Frequency | Example |
|---|---|
| Different intervals in a day | Schedule 1: Execute the job in 1-minute frequency from 8 AM to 8 PM Schedule 2: Execute the job in 5-minute frequency from 8:01 PM to 7.59 AM |
| Different days of the week | Schedule 1: Execute the job in 1-minute frequency on weekdays Schedule 2: Execute the job in 5-minute frequency on weekends |
| Different time zones | Schedule 1: Execute the job in 1-minute frequency from 8 AM to 8 PM in the PST time zone Schedule 2: Execute the job in 5-minute frequency from 8 AM to 8 PM in the BST time zone |
| Different date interval | Schedule 1: Execute the job in 1-minute frequency from February 21, 2022, to March 31, 2022 Schedule 2: Execute the job in 5-minute frequency from April 1, 2022, to March 31, 2026 |
You can create a maximum of three schedules per job.
Click Add Schedule to configure another schedule for the same job. You must create at least one schedule.


You can prevent the execution of jobs during the maintenance period.
Let us assume you have a four-hour maintenance period on March 21, 2022 (1:01 AM - 5:00 AM). Then, you can configure multiple schedules as follows:
- Schedule 1: Execute the job in 1-minute frequency from 8:00 AM on February 21, 2022, to 1:00 AM on March 21, 2022
- Schedule 2: Execute the job in 1-minute frequency from 5:01 AM on February 21, 2022, to 12:00 AM on March 21, 2026
Choose Browsers
A job can run on one or more different types of browsers. For Chrome browser, you can select a version on which you want to run the job.
For information about the behavior of Chrome version 86, see Chrome Version 86.

For mobile browsers, you can specify a platform, such as the iPhone 7 Plus or Pixel. When a job runs on mobile browsers, it is actually running a Chrome browser emulator with the specified platform properties.

When you select Mobile > Custom, then the values of the Browser and Device Model columns on the Sessions page are displayed as "unknown".
Chrome version 86 in AWS locations is executed in Linux-based agents. All other browsers are executed in Windows-based agents running either on Windows 2012 or Windows 2012 R2.
Customize Connection Speeds
The connection speed helps keep performance consistent and realistic. If you choose Native Connection, the job will run at the maximum speed available to AppDynamics data centers. The default is Cable (5/1 Mbps 28ms RTT).

Set Timeouts
Synthetic jobs consume licenses based on the duration of the job, so you can set a timeout to help limit the license consumption. If the job times out, data will still be collected until the timeout expires. The default suggestion for job timeout is 15 seconds for a URL and 30 seconds for a script. You can adjust the timeout as preferred, but keep in mind that short timeouts might result in unsuccessful sessions, and long timeouts might result in overconsumption of licenses.

Configure Availability Rules
You can configure the synthetic job to check the availability of pages and resources. For example, you can set the session status for when a page fails to load or when a resource is missing or inaccessible.
The screenshot below is a configuration to treat the session as Failed if any page fails to load and to treat the session as Warning if any resource fails to load. If the job navigates to a page with an HTTP 4xx or 5xx status code, the session status will be set to FAILED. This will trigger a Critical Event. If a resource fails to load, the session status will be set to WARNING, which will trigger a Warning Event. To set up alerts, see ブラウザ合成モニタリングのアラート.
You can use the Trigger an error event for failed sessions option to choose when to trigger the “Error confirmed” event. By default, the “Error confirmed” event is triggered after an immediate retest. You can also choose to trigger the “Error confirmed” event:
- Immediately when the job fails or
- After 2, 3, 5, or 10 consecutive failures
This helps you avoid false-positive alerts that may occur because of network failure, intermittent issues, or other issues.
In the case of the default "After an immediate retest" option, the "Error started" event is generated immediately when the job fails, and the "Error confirmed" event is generated after the immediate retest. In the case of other options, only the "Error confirmed" event gets generated.

See Health Rule Violation Events for more information.
Use the Advanced Options to ignore or only consider selected resources. For example, the screenshot below might be used to ignore the font resource (which browsers may not have) and only consider high-impact resources like CSS, JavaScript, etc.

Favicons are always ignored when checking the availability of resources.
Configure Performance Thresholds
You can specify the job performance thresholds to send alerting events. For an example of the health rule violation process, see Health Rule Violation Events.
If you check one or both of the "Automatically retest after warning events" or "Automatically retest after critical events" boxes, and the event is generated, then the job will be triggered to re-execute immediately per unconfirmed warning or critical event. For example, if the Critical Events threshold is exceeded, the event Critical Started will be triggered, and the job will rerun until the event Critical Continues is confirmed. Learn more about the synthetic job retest process.

From the Events page shown below, you can see that the results of the first and successive tests exceeded the threshold for synthetic availability and triggered the Error Started, Error confirmed after restart, Error Continues, and Problem Ended events.
