Download PDF
Download page Install a Production EUM Server.
Install a Production EUM Server
You can run the installer using one of three methods:
- Interactive console mode
- GUI Installer
- Silent Installer
The GUI and silent installation methods are described below. To start the installer using interactive console mode, start the installer with the -c switch. The console mode prompts you for the equivalent information that appears in the GUI installer screens.
Additionally, you can run the installer using a Response file (for unattended installations). See Installing with the Silent Installer.
Requirements
- Before starting, download the installer distribution and extract it on the target machine. You obtain the EUM installer from the AppDynamics Download Center.
To secure connections from agents to the EUM Server, AppDynamics strongly recommends that SSL traffic is terminated at a reverse proxy that sits in front of the EUM Server in the network path, and forwards connections to the EUM Server. However if this is not possible in your installation, it is possible to connect with HTTPS directly to the EUM Server. For information on setting up a custom keystore for production, see Secure the EUM Server.

If you install and configure the Events Service with HTTPS support, you must perform a workaround for your EUM Server installation to complete properly. After the Events Service certificate configuration, install the EUM Server without Analytics enabled. Then, install the certificate into the EUM Server keystore following the steps described on the Secure the EUM Server page. Configure Analytics in the Events Services Properties, and restart the EUM Server.
- Before you install the EUM Server, Linux systems must have the
libaiolibrary installed. See the EUM Server Requirements.
Install the EUM Server for a Production Deployment with the GUI Installer
Run the on-premises EUM installer on the machine on which you want to install the EUM Server.
Start the installer:
- From a command prompt, navigate to the directory to which you downloaded the EUM installer.
Change permissions on the downloaded installer script to make it executable:
chmod 775 euem-64bit-linux-2.0.x.x.sh
Run the script:
./euem-64bit-linux-2.0.x.x.sh
Navigate to the directory where you downloaded the EUM installer, and then run the installer as Administrator:
euem-64bit-windows-2.0.x.x.exe
- In the Welcome screen, click Next to continue.
- Scroll to the end of the license agreement and accept the license agreement, then click Next to continue.
- Select the destination directory, and click Next to continue.
- Choose Product for the installation mode. This mode installs the EUM Server on this machine. Use this type if AppDynamics End User Monitoring and the AppDynamics Controller are installed on different hosts. Selecting this type will install a separate MySQL instance on this machine. Click Next.
- In the Database Setup screen:
Enter a new Root User Password and confirm it.
- Enter a new eum_user Password and confirm it.
Click Next.

Usernames and passwords can only consist of ASCII characters. In addition, passwords cannot include the characters '^', '/', or '$'.
- In the AppDynamics End User Monitoring Setup screen:
- Enter a new key store password and confirm it.
- Click Next, then click Finish.
This completes the initial configuration and setup of the EUM Server. When finished, the EUM Server is running.
Post-Installation Tasks
To complete the AppDynamics EUM Server installation, you must perform these additional post-installation tasks (as shown in the last AppDynamics End User Monitoring Setup Wizard screen):
- Configure JVM options
- Provision the EUM license
- Configure the Events Services properties in the
eum.propertiesfile - Connect the EUM Server with the AppDynamics Controller
- Secure the EUM Server by setting up a custom keystore
The EUM Server Installer only configures the HTTP port.
Configure JVM Options
Update the JVM options in the $APPDYNAMICS_HOME\EUM\eum-processor\bin\eum-processor-launcher.vmoptions file.
-XX:+UseConcMarkSweepGC
-XX:+HeapDumpOnOutOfMemoryError
-XX:CMSInitiatingOccupancyFraction=50
-XX:NewRatio=1
-Xms4096m
-Xmx4096m
-DEUM_COMPONENT=processor
-Dlogback.configurationFile=bin/logback.xml
-Dcom.mchange.v2.c3p0.cfg.xml=bin/c3p0.xmlUpdate the JVM options in the $APPDYNAMICS_HOME/EUM/eum-processor/bin/eum-processor file.
# Add default JVM options here. You can also use JAVA_OPTS and EUM_PROCESSOR_OPTS to pass JVM options to this script.
DEFAULT_JVM_OPTS="\
\"-server\" \
\"-XX:+UseConcMarkSweepGC\" \
\"-XX:CMSInitiatingOccupancyFraction=50\" \
\"-XX:+HeapDumpOnOutOfMemoryError\" \
\"-XX:NewRatio=1\" \
\"-Xms4096m\" \"-Xmx4096m\" \
\"-DEUM_COMPONENT=processor\" \
\"-Dlogback.configurationFile=bin/logback.xml\" \
\"-Dcom.mchange.v2.c3p0.cfg.xml=bin/c3p0.xml\""Configure the Events Services Properties
Configure the Events Services properties in the eum.properties file:
- Ensure that Events Services is running.
- Navigate to the
\EUM\eum-processor\bindirectory. - Open the
eum.propertiesfile to edit. In the
eum.propertiesfile, enter these values:Sample
analytics.enabled=true analytics.serverScheme=http analytics.serverHost=hostname-events-service (needs to be the hostname of your Events Service) analytics.port=9080 analytics.accountAccessKey=1a59d1ac-4c35-4df1-9c5d-5fc191003441CODEThe
<analytics.accountAccessKeyis the Events Service key that appears as the>appdynamics.es.eum.keyvalue in the Administration Console: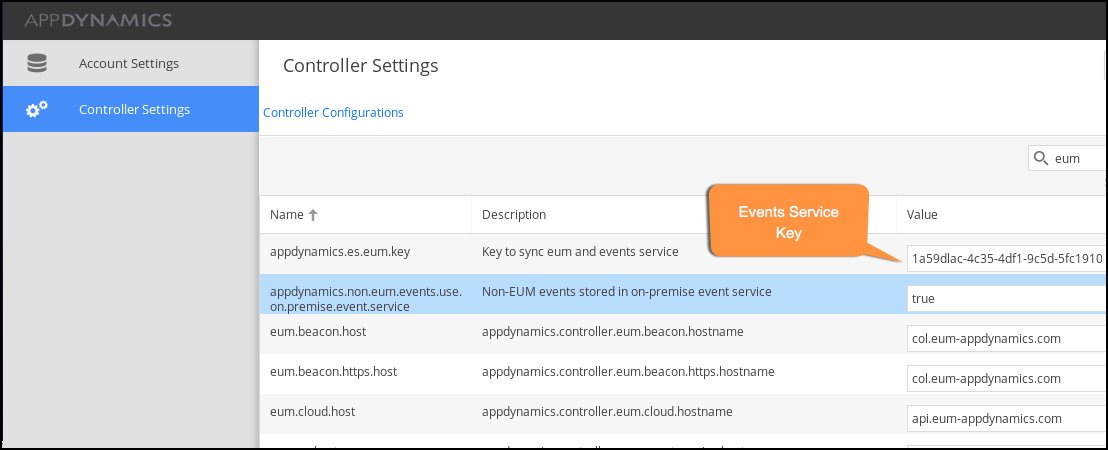
The configuration should display similar to this example: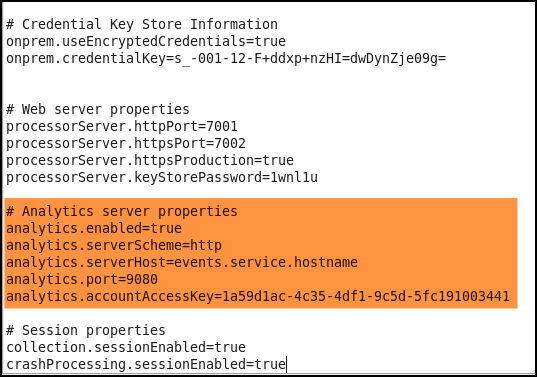
After updating the
eum.propertiesfile, restart the EUM Server.
Provision the EUM License
Follow the provision instructions based on your deployment type:
- Provision the EUM License for a Single-Tenant Controller
- Provision the EUM License for Multi-Tenant Controllers
Connect the EUM Server with the AppDynamics Controller
Connect the EUM Server with the AppDynamics Controller:
- Log in to the Administration Console.
- Set these Controller properties:
eum.cloud.host: http://eum-host-name:7001– Location where the Controller will poll for EUM metrics.eum.beacon.host: http://eum-host-name:7001– Location where the JavaScript Agent will be configured to send out beacons over the HTTP protocol.eum.beacon.https.host: https://eum-host-name:7002– Location where JavaScript Agent will be configured to send out beacons over the HTTPS protocol.eum.mobile.screenshot.host: http://host-name:7001– Location where the Controller will search for mobile screenshots.
Installing with the Silent Installer
Instead of using the GUI installer, you can use the silent installer to perform an unattended installation. The silent installer uses a response file as a source for the initial configuration settings. It's useful for scripting installation or performing large scale deployments.
To use a response file for installation:
Create a file named
response.varfileon the machine on which you will run EUM installer and include the following:sys.adminRights$Boolean=false sys.languageId=en sys.installationDir=/AppDynamics/EUM euem.InstallationMode=split euem.Host=eumhostname euem.initialHeapXms=1024 euem.maximumHeapXmx=4096 euem.httpPort=7001 euem.httpsPort=7002 mysql.databasePort=3388 mysql.databaseRootUser=root mysql.dbHostName=localhost mysql.dataDir=/usr/local/AppDynamics/EUM/data mysql.rootUserPassword=singcontroller mysql.rootUserPasswordReEnter=singcontroller eumDatabasePassword=secret eumDatabaseReEnterPassword=secret keyStorePassword=secret keyStorePasswordReEnter=secret eventsService.isEnabled$Boolean=true eventsService.serverScheme=http eventsService.host=eventsservice_host eventsService.port=9080 eventsService.APIKey=1a234567-1234-1234-4567-ab123456
- Modify values of the installation parameters based on your own environment and requirements. Particularly ensure that the directory paths and passwords match your environment.
Run the installer with the following command:
euem-64bit-windows-2.0.x.x.exe -q -varfile response.varfile
./euem-64bit-linux-2.0.x.x.sh -q -varfile response.varfile