Download PDF
Download page License Management.
License Management
On this page:
Related Pages:
AppDynamics licenses determine the available features and deployment scales. For all AppDynamics Application Performance Monitoring (APM) Platform deployments (except the on-prem EUM Server and on-prem Synthetic Server), the license resides on the Controller. For the on-prem EUM Server and Synthetic Server, the EUM license resides on the on-prem EUM Server.
There are two different types of AppDynamics Licenses: Pro and Lite. When a free trial ends, the license converts to a Lite license, as described in Lite and Pro Editions.
When you purchase APM licenses, you can create rules to fine-tune license distributions across your organization.
Permissions
Users must have a role with the View and Configure Licenses permission for license management activity.
License Management Tool
The Controller uses licensing to determine available features and scale of an APM Platform deployment The License management tool provides:
- granular control with precise rules and access keys to restrict which hosts and applications consume licenses.
- great visibility with detailed current and historical usage reporting across business units and services.
To access the License management tool, go to ![]() > Admin > License.
> Admin > License.
The following model illustrates the flexibility of license assignments.

The Application and Machine Scopes allows you to assign licenses to specific applications and machines. On the Create and Edit dialogs, you can create or edit rules to specify license allocation according to selected agents, applications, and servers. For example, a rule can be applied to one application running on several specific servers.

View License Information
To access the License management tool, go to ![]() > Admin > License.
> Admin > License.
The License dashboard consists of three tabs:
- Account Usage: displays the maximum license usage in a specified time range
- Rules: allows you to configure license allocation across machines and applications
- Account: displays the account name, access key, and expiration
The following sections cover each of the tabs in more detail.
Account Usage
In the Account Usage tab, you can view the number of licenses consumed and license expiration dates for the following product areas:
- Applications
- User Experience
- Databases
- Server Visibility
- Network Visibility
- Analytics
You can click on each application type to see specific license usage. You can specify the time range that you want to see data for in the drop-down menu on the upper right corner. For more information about how AppDynamics defines license units for each product module, see License Entitlements and Restrictions.
For Analytics, the graph shows the cumulative license usage over the time period you specify, even though the license usage count is reset daily. To see your license usage for one day, set the time range to 23 hours and 59 seconds.
Rules
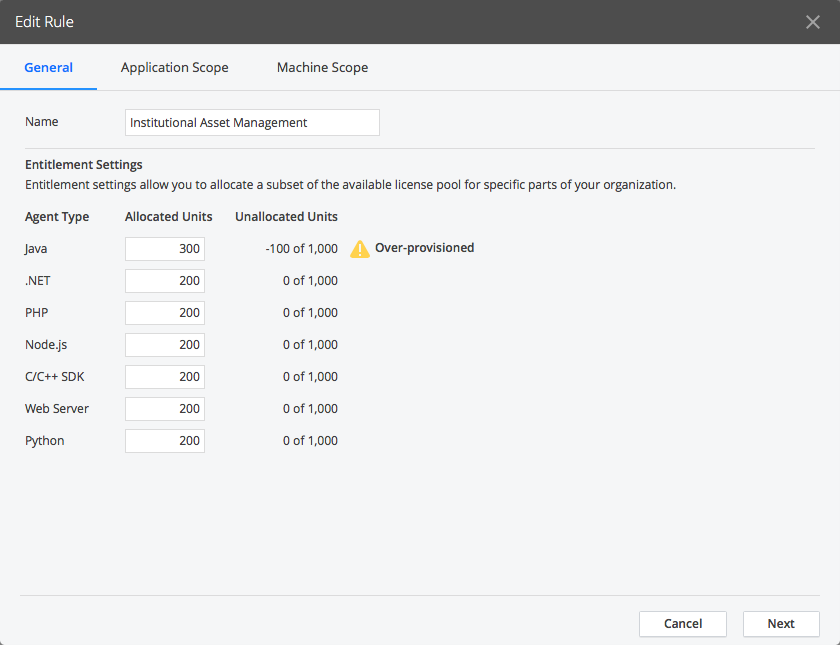
In the Rules tab, you can create rules to specify the number of APM licenses to allocate to specified applications and machines. If you choose not to create any rules, your license allocation follows the default rule, which distributes the licenses across all applications and machines.
In a rule, you can specify the following allocation details:
- How many units you want to allocate to each rule
- Which applications are allowed to consume the units (agents) allocated by this rule
- Which servers are allowed to consume the units (agents) allocated by this rule
When license rules are enabled, you must ensure that all your units are accounted for by either the default rule or a custom rule. AppDynamics follows a mix and match model: you can adjust the number of units allocated to each license rule at any time.
Create a Custom Rule
- Go to
 > Admin > License.
 - Click Create.
- In the General tab, enter the name of your rule and the number of units for each agent module type that this rule allocates.
- In the Application Scope tab, select Specified Applications to restrict which applications agents can report to.
Only agents that report to the applications you specify can consume the units allocated by this rule. You can select one or more applications from the Available Applications list and click the left arrow button to move the applications to the Included Applications box. You can specify matching criteria for allowed applications using the Add button. You can also specify matching criteria for applications that you have not yet created. The applications you specify using matching criteria will not appear in the Selected Applications box. You can select up to 100 applications to assign to a rule. - In the Server Scope tab, select Specified Servers to restrict which servers agents can be deployed to.
Only agents deployed on the servers you specify can consume the units allocated by this rule. You can select one or more servers from the Available Servers list, and click the left arrow to move the applications to the Selected Applications box. You can specify matching criteria for allowed servers using the Add button. You can also specify matching criteria for servers not yet monitored by AppDynamics. The applications you specify using matching criteria will not appear in the Selected Applications box.
Using the criteria specifications, you can select applications and servers by matching multiple machines using the match criteria. This is more efficient than scrolling through thousands of applications and machines to make your selections manually.
You can also add uninstrumented applications to the rule in the Application Scope and unmonitored machines in the Server Scope, so that when you install the agents to instrument these unmonitored applications and servers, they will be allowed to consume licenses defined in this rule.
After You Create a Rule
After creating your custom rule, return to the default rule and decrement your unit allocation by the number of units that you allocated in your custom rule. Otherwise, the allocations will show as over-provisioned.
For each rule you create, a new access key is generated, and the agents under that rule are authenticated with that generated key. Update your agent to use this new access key and restart the agent.
You must allocate the same number of machine agents as your APM agents. For example, if you allocate 10 Java agents, 10 .NET agents, and 10 Node.js agents, you must allocate 30 Machine Agent units.
Over-provisioning Units
When configuring rules, you can allocate more units than you were originally provisioned by AppDynamics. Over-provisioning units buffers your unit allocation and is useful if you are unsure which agent type will consume more units. While your unit allocation is unbounded, AppDynamics limits your unit usage according to the number of licenses you purchase and continues to reports data for over-provisioned units as long as you have the units available, such as when the license usage for certain agents is lower than expected.
Troubleshoot License Agents
If a licensed agent cannot register with the Controller:
- check that the user account has a product license for the relevant agent type.
- If the user account has license rules defined, make sure the rules have the correct number of license units allocated. To change the number of allocated units in a rule:
- Go to > Admin > License > Rules.
- Open the rule (there might be only one License Rule, named Default) and click Edit.
- In the General tab, set the Allocated Units field for the relevant license and apply the change.
- Go to
License Rules Best Practices
When creating license rules, you may want to follow consistent criteria for selecting which applications belong to a rule. It is recommended that you:
- Group applications by business unit if you want a rule to contain multiple applications.
- Select only one application for a rule if you want to view individual application usage.