Download PDF
Download page Agent Management User Interface.
Agent Management User Interface
You can view all the installed agents on the Agent Management tab in the Controller UI. You can navigate using any of the following ways on the Controller UI to view the Agent Management tab:
- Home > Agent Management > Manage Agents
- Settings > Agent Management > Manage Agents
Permissions
To access the Agent Management UI, you require to be an administrator or a user with Agent Management role-based access control. The administrators can provide access to the application owners to view or manage App Server Agent inventory from the Agent Management UI. See Role-Based Access Control.
Currently, an administrator can manage only App Server Agents, and Machine Agents by using Smart Agents. An administrator can also view the tasks in progress, history of tasks, and import configuration to Controller.
The application owners with the role-based access control (RBAC) can manage the app server agents based on their roles.
Role-Based Access Control
The ITOps administrator (with the administrator role) can now use the role-based access control to provide permissions to application owners. These permissions allow the application owners to perform the following for a specific application (View Agent, Edit Agent or both) or for a specific account (Install Agent):
- View Agent: to allow users in a specific role view the App Server Agent inventory in the Agent Management UI for the specific applications.
- Edit Agent: to allow users in a specific role manage one or more App Server Agents for the specific applications.
- Install Agent: to allow users with specific role to install the agents based on all the Smart Agents that are associated with the account. After installation, the users can manage those agents from the App Server Agent inventory on the Agent management UI.
- AppOps or application owners cannot manage Machine Agents and Smart Agents.
- Tabs other than App Server Agents will be disabled for non-admin users.
Application-Based Access Control
An ITOps administrator can create a role for an application owner and assign any specific application to it. This allows the application owner to use the Agent Management UI to view agent, manage agent, or perform both for that application. If you select the Edit Agent permission the user with the specific role can manage only the agent associated with the application.
Perform the following to provide access based on the application:
- Create a role by navigating to Settings>Administration>Roles>Create, then associate the role with a user.
You must associate the role to the username of the application owner. See Manage Controller Tenant Users and Groups.
If you have already created the role, select the role name under Name on the left pane. - Click Applications.
- Under Custom Permissions for Applications / Tiers, click Add.
- Select the applications on which you require to allow the application owners to view or manage the Agents, and then click Done.
- Select Custom under Permissions.
- Select View to enable the Edit checkbox, and then select Edit.
- Click Edit (All)
- Select View Agent if you require the users in the specified role to view the application-specific agent inventory in the Agent Management UI.
- Select Edit Agent if you require the users in the specified role to view and manage the agents through the Agent Management UI.
Account-Based Access Control
An ITOps administrator can create a role for an application owner. Administrator can specify the Install Agent permission for a role within a specific account . If you select the Install Agent permission, the user of the specified role can install the agents on all the Smart Agent hosts connected to that account. After the agent installation, the users can view and manage those agents on the Agent Management UI.
Perform the following to provide access to install agents at the account level:
- Create a role by navigating to Settings>Administration>Roles>Create, then associate the role with a user.
You must associate the role to the username of the application owner. See Manage Controller Tenant Users and Groups.
If you have already created the role, select the role name under Name on the left pane. - Click Account>Add.
- Select Install Agent.
- Click Done.
Hence, the application owner can log in using their credentials and access Agent Management to manage the app server agents.
View and Manage Agent Details
When you click Manage Agents, you can view the following Agent details:
- App Server Agents
- Machine Agents
- Smart Agents
- Database Agents
- Analytics Agents
- Network Visibility Agents
- Cluster Agents

You cannot manage Analytics Agents, Network Visibility Agents, and Cluster Agents using Smart Agent or Smart Agent CLI. Therefore, you cannot install, upgrade, or rollback these agents from the Agent Management UI.
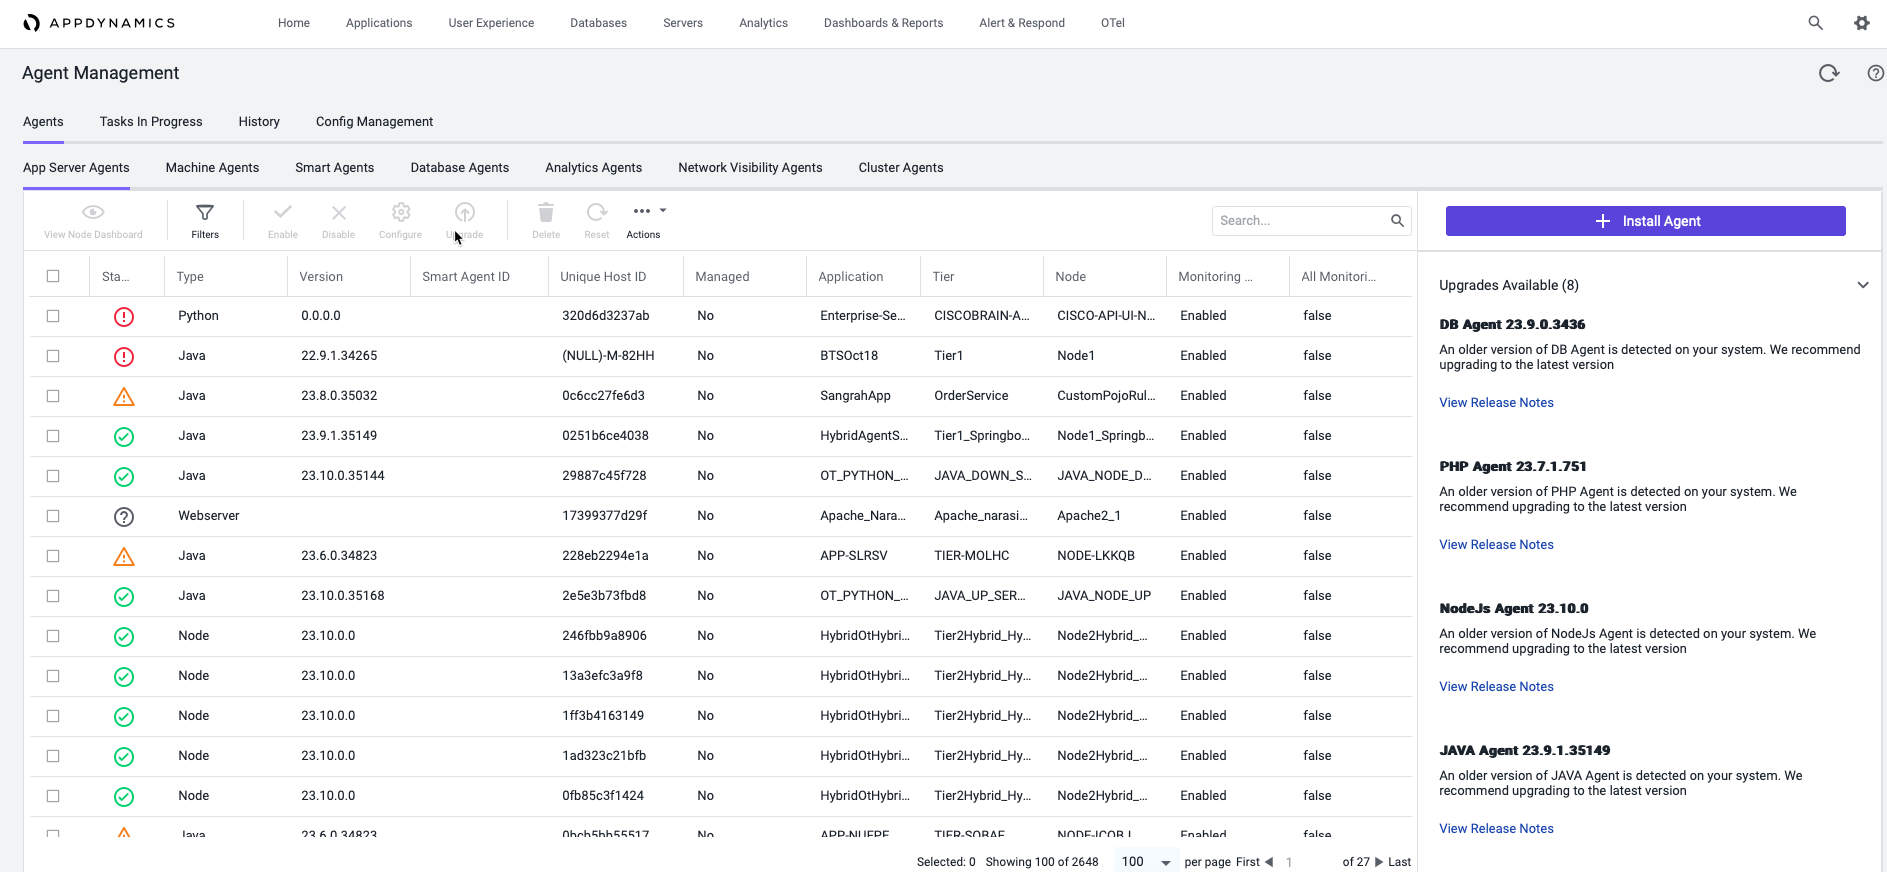
On the right pane you can view details of the agents that require an upgrade.
The Agent Management page provides the following details:
Agents
This displays all agents with the inventory details. The following sections include the agent details and actions that you can perform on the respective agents:
- App Server Agents
- Machine Agents
- Smart Agents
- Database Agents
- Analytic Agents
- Network Visibility Agents
- Cluster Agents
If you have not installed Smart Agent, the Smart Agent ID and Managed columns will not display any value.
App Server Agents
Inventory:
| Name | Description |
|---|---|
| Status | Displays the status of the agents on which the application is running.
|
| Type | The type of the agent such as Java, Python, Node, Webserver, and Dotnet. |
| Version | The current version of the agent. |
| Smart Agent ID | The ID of the Smart Agent that manages the corresponding app agent. If the value is not displayed, then Smart Agent is not installed. |
| Unique Host ID | The unique ID of the host on which the agent is running. |
| Managed | The value can be Yes if the agent is managed by Smart Agent and No if the agent is not managed by Smart Agent. |
| Application | The application on which the corresponding agent is running. |
| Tier | The service running on the corresponding application. |
| Node | The service instance of the service running on the application. |
| Monitoring Status | The value is enabled if monitoring is enabled for the corresponding agent. The value is disabled if the monitoring is disabled for the corresponding agent. |
| All Monitoring Disabled | Disable monitoring for the associated application. |
Actions:
| Action Menu | Description |
|---|---|
| View Node Dashboard | To view the Nodes & Tier dashboard of the required node. You can click the checkbox next to the specific agent, then click View Node Dashboard. |
| Filters | To filter based on your requirement. Click Filters > Add Criteria. You can use Filters to add different filter criteria based on your requirement. For example, to see all Java Agents that have outdated versions:
|
| Enable Monitoring | To enable the selected agents. Select the required agents, then click Enable. The Monitoring Status displays as Enabled. |
| Disable Monitoring | To disable the selected agents. Select the required agents, then click Disable. The Monitoring Status displays as Disabled. |
| Configure | To configure the node properties of the selected agent. Select the agent, then click Configure. |
| Upgrade | To upgrade the selected agents. Select the required agents, then click Upgrade. |
| Delete | To delete the selected agents. Select the agents that you want to delete, then click Delete. |
| Reset | Resetting the Agent is a way to force the agent to register itself with the Controller in the same way it does at JVM/CLR startup, but without restarting the JVM/CLR. In the case of JVMs, if the agent is monitoring Collections using the Automatic Leak Detection or Custom Memory Structure feature, then resetting it will clear out these monitored Collections. The JVM will need to be restarted in order to start monitoring them again. |
| Actions | To perform the following actions:
|
| Export Grid Data | To export the grid data in CSV format. It provides details of all the available app agents. Click Export Grid Data. |
Machine Agents
Inventory:
| Name | Description |
|---|---|
| Status | Displays the status of the agent on which the application is running.
|
| Version | The current version of the Machine Agent. |
| Smart Agent ID | The ID of the Smart Agent that manages the corresponding Machine Agent. If the value is not displayed, then Smart Agent is not installed. |
| Unique Host ID | The unique ID of the host on which the agent is running. |
| Managed | The value is Yes if the Smart Agent is installed and No if the Smart Agent is not installed. |
| Application | The application on which the corresponding agent is running. |
| Monitoring Status | The value is enabled if monitoring is enabled for the corresponding agent. The value is disabled if the monitoring is disabled for the corresponding agent. |
Actions:
| Action Menu | Description |
|---|---|
| Details | To view the server summary of the selected Machine Agent. You can click the checkbox next to a specific agent, then click Details. |
| Filters | To filter based on your requirement. Click Filters. You can use Filters to add different filter criteria based on your requirement. |
| Enable Monitoring | To enable monitoring for the selected agents. Select the required agents, then click Enable. |
| Disable Monitoring | To disable monitoring for the selected agents. Select the required agents, then click Disable. |
| Configure | To configure the node properties of the selected agent. Select the agent, then click Configure. |
| Upgrade | To upgrade the selected agents. Select the required agents, then click Upgrade. |
| Delete | To delete the selected agents. Select the agents that you want to delete, then click Delete. |
| Reset | Resetting the Agent is a way to force the agent to register itself with the Controller in the same way it does at JVM/CLR startup, but without restarting the JVM/CLR. In the case of JVMs, if the agent is monitoring Collections using the Automatic Leak Detection or Custom Memory Structure feature, then resetting it will clear out these monitored Collections. The JVM will need to be restarted in order to start monitoring them again. |
| Actions | To perform the following actions:
|
| Export Grid Data | To export the grid data in CSV format. It provides the details of all the available machine agents. Click Export Grid Data. |
Smart Agents
Inventory:
| Name | Description |
|---|---|
| Status | Displays the status of the Smart Agent on which the application is running.
|
| Version | The version of the Smart Agent. |
| Smart Agent ID | The ID of the Smart Agent that is installed on the host machine to manage the agents. |
| Hostname | The hostname of the machine on which the corresponding Smart Agent is running. |
| Application | The number of applications using the corresponding Smart Agent. |
| Connected Agents | The number of agents (app server agents or Machine Agents) |
Actions:
| Action Menu | Description |
|---|---|
| Details | To view the application summary on which the selected Smart Agent is installed. The summary includes application names along with the number of connected agents. You can click the checkbox next to a specific smart agent, then click Details. |
| Filters | To filter based on your requirement. Click Filters > Add Criteria. You can use Filters to add different filter criteria based on your requirement. |
| Upgrade | To upgrade the selected smart agents. Select the required smart agents, then click Upgrade. |
| Export Grid Data | To export the grid data in CSV format. It provides all the details of all the smart agents. Click Export Grid Data. |
Database Agents
Inventory:
| Name | Description |
|---|---|
| Hostname | The hostname of the machine on which the Database Agent is installed. |
| Version | The current version of the Database Agent. |
| Agent Name | The name that you specify for the corresponding agent during installation. |
| Status | The status of the agent. |
| Start Time | The time when the agent starts or restarts. |
You cannot perform any action on this agent page.
Analytics Agents
You cannot install, upgrade, or rollback Analytics Agent from the Agent Management UI because Smart Agent does not support this agent.
Inventory:
| Name | Description |
|---|---|
| Name | The name of the Analytics Agent that was specified during installation. |
| Unique Host ID | The unique ID of the host machine on which Analytics Agent is installed. |
| Version | The current version of the Analytics Agent. |
| Last Connected | The date and time when the agent was last connected to the Controller. |
| Log Pipeline Health | The health status of the Log Analytics pipeline. |
| Transaction Pipeline Health | The health status of Transaction Analytics pipeline. |
To view the Analytics Agent summary, you can double click the required Analytics Agent or select the agent, then click Details.
You can filter the details based on name and health of the pipelines.
Network Visibility Agents
You cannot install, upgrade, or rollback Network Visibility Agent from the Agent Management UI because Smart Agent does not support this agent.
Inventory:
| Name | Description |
|---|---|
| Unique Host ID | The unique ID of the host machine on which Network Visibility Agent is installed. |
| Hostname | The hostname of the machine on which the Network Visibility Agent is installed. |
| Application(s) | The application(s) on which the corresponding Network Visibility Agent is installed. |
| Agent Version | The current version of the Network Visibility Agent. |
| OS Name | The name of the Operating System on which the application is installed. |
| OS Version | The version of the Operating system on which the application is installed. |
| Dynamic Monitoring Mode | The values can be any of the following:
|
| Enabled | The Enabled icon represents that the agent is enabled. |
Actions:
You can select the required Network Visibility Agent and perform the following actions:
| Action Menu | Description |
|---|---|
| Details | To view the summary of the selected Network Visibility Agent. |
| Pcap Configuration | To configure the packet capture for the selected agent. |
| Change DMM | Select the agent(s) for which you require to change the Dynamic Monitoring Mode. |
| Start Pcap | Select the agent(s) on which you require to start the packet capture. |
| Enable Monitoring | Select the agent(s) that you want to enable for monitoring, then select Enable. |
| Disable Monitoring | Select the agent(s) that you want to disable for monitoring, then select Disable. |
| Delete | Select the agent(s) that you want to delete, then select Delete. |
Cluster Agents
You cannot install, upgrade, or rollback Cluster Agent from the Agent Management UI because Smart Agent does not support this agent.
Inventory:
| Name | Description |
|---|---|
| Cluster name | The name of the Cluster Agent that you specified during the installation. |
| Version | The version of the installed Cluster Agent. |
| Kubernetes Version | The Kubernetes Version on which the Cluster Agent is running. |
| Status | The status of the Cluster Agent. |
Actions:
You can select the required Cluster Agent and perform the following actions:
| Action Menu | Description |
|---|---|
| Details | To view the summary of the selected Cluster Agent. |
| Delete | To delete a Cluster Agent. Select the required agent that you want to delete, then click Delete. |
| Enable | To enable a Cluster Agent. Select the required agent that you want to enable, then click Enable. |
| Disable | To disable a Cluster Agent. Select the required agent that you want to disable, then click Disable. |
| Configure | To edit the Cluster Agent Namespace. This is available for users who have administrator permissions. |
Tasks In Progress
This displays details of all the tasks such as install, upgrade, or rollback that are in progress. You can click and download the log file for the required agent to view the log details.
History
This displays the details of what all tasks such as install, upgrade, or rollback were performed. You can click and download the log file for the required agent to view the log details.
Config Management
The Import Config dialog enables you to upload a config.xml file to the Controller, and specify a unique name for the configuration.
- Use a naming convention that helps you identify the type of machine for the configuration.
- Consider using a date or version scheme for the configuration name.
- Click a configuration, then click Edit Config to modify the configuration name.
- Double-click a config to display the XML. You can copy the XML, but you cannot modify it.