Download PDF
Download page Install the AppDynamics Site Extension for Java.
Install the AppDynamics Site Extension for Java
You can use the Windows Azure Portal to add the AppDynamics Azure Site Extension to your Azure App Service web app. Azure Site Extension is used by Ops teams that may not have access to source files, or would not like to modify or recompile them, yet still want to monitor their Azure projects and solutions.
Prepare to Install
To install the AppDynamics for Windows Azure Site Extension, you need:
- Connection information for your AppDynamics Controller. See Agent and Controller Compatibility.
- A Windows Azure account.
- An Azure web app to monitor.
If you are upgrading from a previous version, see Upgrade the AppDynamics Azure Site Extension.
Add the AppDynamics Azure Site Extension
Add the AppDynamics Azure Site extension as you would any site extension for any Azure web app.
- Log in to the Windows Azure Portal.
Browse to your web app. To configure the Java Agent using environment variables, add the environment variables before you install the AppDynamics Azure Site Extension. See Configure the agent using environment variables.
- From the DEVELOPMENT TOOLS list, click Extensions.
- Click +Add to install the version of the AppDynamics Java Agent you want to add to your web app.
After you install the AppDynamics Azure Site Extension, it displays in the installed extensions list.
Configure the Controller Connection
There are two options to configure the Java Agent to connect to the AppDynamics Controller:
- Configure the Controller connection using the Kudu Console.
- Configure the Controller connection settings using environment variables.
See Agent-to-Controller Connections.
Configure the Agent with the Kudu Console
When you add the AppDynamics Azure Site Extension to your web app, you can interactively configure the Java Agent using the Kudu Console.
- Navigate to the AppDynamics Controller Configuration page in the Kudu Console:
http://{web app}.scm.azurewebsitesJava/appdynamics/
For example:https://myazureexample.scm.azurewebsitesJava/appdynamics/ - On the AppDynamics Controller Configuration page, enter your Controller connection information. For example:
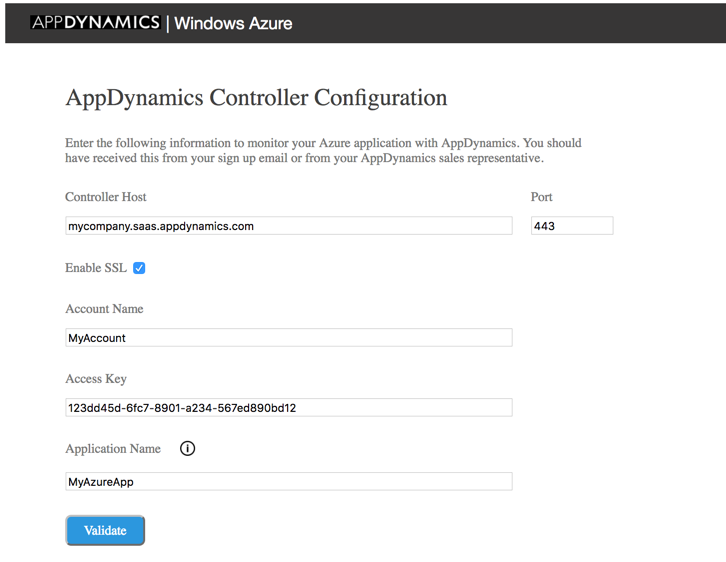
- Click Validate to test the connection to the AppDynamics Controller and save your settings.
- Restart your web app. After you apply some load to your web app, you can view it on flow maps in the AppDynamics Controller UI.
Configure the Agent Using Environment Variables
Configuring the Java Agent using environment variables allows for unattended configuration. To configure agents, add the environment variables before you install the AppDynamics Azure Site Extension:
- Navigate to SETTINGS > Application Settings for your web app.
- Add the Java Agent environment variables under App settings:
- APPDYNAMICS_AGENT_ACCOUNT_ACCESS_KEY: A unique key associated with the Controller account.
- APPDYNAMICS_CONTROLLER_HOST_NAME: The hostname of the AppDynamics Controller.
- APPDYNAMICS_CONTROLLER_SSL_ENABLED: Set it to
Trueto enable SSL connection to the Controller. Otherwise set it toFalse. - APPDYNAMICS_AGENT_ACCOUNT_NAME: The account name you use to log on to the Controller.
- APPDYNAMICS_AGENT_ACCOUNT_ACCESS_KEY: The account key you use to log on the Controller.
- APPDYNAMICS_AGENT_APPLICATION_NAME: The business application name in the Controller.
- APPDYNAMICS_AGENT_TIER_NAME: The tier name in the Controller.
- APPDYNAMICS_AGENT_NODE_NAME: The node name in the Controller.
- Restart your web app. After you apply some load to your web app, you can view it on flow maps in the AppDynamics Controller UI.
Upgrade the AppDynamics Azure Site Extension
When you click the Extensions tab for your web app, the Microsoft Azure Portal displays the currently installed version of the AppDynamics Azure Site Extension. The Update Available column of the installed extensions list indicates if there is a more recent minor release of the Java Agent available. If so, you can click to update the extension from the list.
Upgrade a Major Version of the Java Agent
AppDynamics maintains major release versions of the Java Agent as separate site extensions. Therefore, you must uninstall the installed version of the AppDynamics Azure Site Extension before you upgrade to a new major release:
- Log in to the Windows Azure Portal.
- Stop your web app.
- Click the AppDynamics Azure Site Extension from the list of installed extensions and click Delete to uninstall it.
- Install the new version of the AppDynamics Azure Site Extension as normal.