Download PDF
Download page Account Administration.
Account Administration
This page describes the secure online Account Management Portal for managing AppDynamics accounts.
The Account Management Portal provides a secure online means for account administrators to manage users and account resources and for non-administrators to edit their profile, review account details, access AppDynamics Community, University, and Downloads.
Use the Account Management Portal to:
- Manage user accounts globally.
- Configure an Identity Provider (IdP).
- View license details and usage.
- Set Tenant-specific company roles.
- Assign Tenant and license access to users.
View and access Controller Tenants from one location.
- Inactivate or edit user accounts for all AppDynamics components simultaneously.
Use the Controller Tenant Administration UI to:
- Create and add users to the Controller Tenant.
- Set role and group security specific to the Tenant.
AppDynamics refers to a Tenant as the Controller in some code. They are considered one and the same.
Account Management Portal Overview
Upon login, the Account Management Portal opens to the Account Overview page. Your user role determines your view. See Role Permissions Matrix.
- Account Overview—displays account summary information, Tenant access, and feature access tools based on your user type and role permissions.
- Entitlements
License Management—provides Cloud-based license and Controller-based subscription usage information for the current or specified usage cycle.
- University Subscriptions—provides your current educational benefits, including AppDynamics University subscriptions, Instructor Day(s), and exam vouchers.
- Professional Services—displays a list of services to help you plan deployments, configurations, workstreams, and other technical projects.
- Support Contracts—displays a list of support entitlements associated with your account.
- Access Management
- Manage User Accounts—allows user account administrative functions.
- Configure Single Sign on through SAML—provides the means to configure your basic SAML for single sign-on (SSO) capability.
- Cloud Tenant Roles—provides user role assignment options.
- Service Principals—provides the means to view, edit, or create service principals for secure access to Cloud and Controller Tenants.
- Downloads—allows downloading AppDynamics software packages for Controller Tenants that are available for your account.
- Profile—provides user profile options.
- University—provides training information and learning tools.
- Community—provides a discussion forum, knowledge base, and user community.
Use the Accounts Management Portal to fully deactivate or edit a user account for all AppDynamics components and Tenants simultaneously. User account management through a Tenant UI affects permissions for that Controller Tenant only.
Review Functionality by User Role
Functions are available based on your user type and role permissions.
Select a user type to see the options that display for that role.
This section displays summary information for up to three open support tickets. Use this area to access the AppDynamics Help Center and create new support requests.
If you don't see a particular ticket in the summary, click View more in Support to see all tickets in Zendesk.
To review current support tickets:
- Click a support ticket to view its details.
- Click My activities to access the Requests page.
- View your support tickets, open a new one, or browse account tickets.
- Search requests or sort by Status to filter the view.
To open a new support request:
- Click Submit a request or Create a New Request to open a new support ticket with AppDynamics.
- Select a request type from the dropdown.
- (Optional) Enter additional emails to share the request submission.
- Enter a Subject.
- Enter a Description.
- Add files, screenshots, or other attachments that will help the support staff effectively address your issue.
- Click Submit.
A member of the AppDynamics support staff will respond to the email address used to log in as soon as possible.
To follow support ticket activity:
- Select an open ticket or click View more in Support.
- Navigate to Organization Requests and click Follow to begin receiving update notifications for open support requests.
- Click Following to review the items you are currently following.
- Select the Show dropdown to review any other items you may be following through Zendesk.
This section displays summary information for up to three licensed and currently active resource projects. If you don't see a particular resource, click View more in Professional Services.
The Professional Services page provides a complete list of services associated with your AppDynamics account, including:
- Service name
- Number of days used/total number of days
- Date the service ended
- Entitlement effective dates
- Project manager
This section provides a summary of your company account details and contact information for your AppDynamics account representative(s).
You need these account details when contacting AppDynamics Sales or Support.
Select Schedule a call to select a date and time for Support to return your call. Or click Email us to send a message to all of your AppDynamics account representative(s).
AppDynamics refers to a SaaS Controller Tenant or an on-premises Controller license as a subscription. The Subscriptions section provides a summary of Controller Tenant and on-premises Controller subscriptions available to your company account. Users with the License Admin role can:
- Launch a Controller Tenant
- Review Controller Tenant system status
- Review license usage details
- View subscription details and license expiration date
- Update the on-premises Controller MAC address
Launch a Controller Tenant:
There are several ways to launch a Controller Tenant.
From the Overview page:
- Click a [Controller] Name or Actions
 > Launch AppDynamics.
 - Alternatively, select View all subscriptions or Search subscriptions if you don't see the Tenant you want.
- Select the Tenant name and click Launch AppDynamics.
From your user name dropdown:
- Click your name.
- Click a Tenant or select View All.
From the Profile page:
- Click your name.
- Select Profile.
From the Personal Summary page, click a Tenant URL or select View All.
Review Controller Tenant System Status:
The System Status is updated every two hours by default. A browser refresh provides real-time status.
- Click a link in the System Status column to view these details:
- Current status
- Past 90 days uptime and downtime
- Incidents and maintenance reports
- Planned maintenance events
- Use the Tenant name dropdown to select a different Tenant for which you hold a subscription.
View License Usage:
Click a link in the License Usage column to view these details:
- Associated Products
- Product Family
- Current usage for the specified time period
- Period of time a product can consume licenses before the usage limit is reset
View Subscription Details:
For a Controller Tenant:
- Click the [Tenant] Name or Actions to review:
- Controller URL
- Account Name
- Access Key
- Controller Version
- IP Ranges
- Click Show to display the Access Key.
For an on-premises Controller:
- Click the [Controller] Name or Actions to review:
- View the License Type
- View the License ID (if applicable)
- View and edit the MAC Address
- View the License file update date
- Download the license file
- If the Controller has a High Availability (HA) license, click the License ID to view the corresponding Primary license ID.
- A Controller with an HA license displays directly under the Primary Controller license.
- Click Download license file to save a copy of the file to your local hard drive.
Edit an On-Premises Controller MAC Address:
AppDynamics licenses for on-premises Controllers are tied to the machine's MAC address on which you installed the Controller. The original MAC address set up must be done by AppDynamics Operations when a new on-premises license is first provisioned. Afterward, you can update your MAC address manually.
To update the MAC address on a permanent license:
- Click the [Controller] Name or Actions
Click Edit next to the MAC address.
- Enter the new hexadecimal MAC address.
- Click Save.
This section displays summary information for up to three open support tickets. Use this area to access the AppDynamics Help Center and create new support requests.
If you don't see a particular ticket in the summary, click View more in Support to see all tickets in Zendesk.
To review current support tickets:
- Click a support ticket to view its details.
- Click My activities to access the Requests page.
- View your support tickets, open a new one, or browse account tickets.
- Search requests or sort by Status to filter the view.
To open a new support request:
- Click Submit a request or Create a New Request to open a new support ticket with AppDynamics.
- Select a request type from the dropdown.
- (Optional) Enter additional emails to share the request submission.
- Enter a Subject.
- Enter a Description.
- Add files, screenshots, or other attachments that will help the support staff effectively address your issue.
- Click Submit.
A member of the AppDynamics support staff will respond to the email address used to log in as soon as possible.
To follow support ticket activity:
- Select an open ticket or click View more in Support.
- Navigate to Organization Requests and click Follow to begin receiving update notifications for open support requests.
- Click Following to review the items you are currently following.
- Select the Show dropdown to review any other items you may be following through Zendesk.
This section displays summary information for up to three licensed and currently active resource projects. If you don't see a particular resource, click View more in Professional Services.
The Professional Services page provides a complete list of services associated with your AppDynamics account, including:
- Service name
- Number of days used/total number of days
- Date the service ended
- Entitlement effective dates
- Project manager
This section provides a summary of your company account details and contact information for your AppDynamics account representative(s).
You need these account details when contacting AppDynamics Sales or Support.
Select Schedule a call to select a date and time for Support to return your call. Or click Email us to send a message to all of your AppDynamics account representative(s).
This section displays summary information for up to three open support tickets. Use this area to access the AppDynamics Help Center and create new support requests.
If you don't see a particular ticket in the summary, click View more in Support to see all tickets in Zendesk.
To review current support tickets:
- Click a support ticket to view its details.
- Click My activities to access the Requests page.
- View your support tickets, open a new one, or browse account tickets.
- Search requests or sort by Status to filter the view.
To open a new support request:
- Click Submit a request or Create a New Request to open a new support ticket with AppDynamics
- Select a request type from the dropdown.
- (Optional) Enter additional emails to share the request submission.
- Enter a Subject.
- Enter a Description.
- Add files, screenshots, or other attachments that will help the support staff effectively address your issue.
- Click Submit.
A member of the AppDynamics support staff will respond to the email address used to log in as soon as possible.
To follow support ticket activity:
- Select an open ticket or click View more in Support.
- Navigate to Organization Requests and click Follow to begin receiving update notifications for open support requests.
- Click Following to review the items you are currently following.
- Select the Show dropdown to review any other items you may be following through Zendesk.
This section provides a summary of your company account details and contact information for your AppDynamics account representative(s).
You need these account details when contacting AppDynamics Sales or Support.
Select Schedule a call to select a date and time for Support to return your call. Or click Email us to send a message to all of your AppDynamics account representative(s).
Navigate the Account Overview Page
The Account Overview page is role-based and presents a summary of account components according to your user role. Components are presented in grouped panes, each with a link to access the full detail page.
Access a Tenant
AppDynamics refers to a Tenant license as a subscription. You can launch an available Tenant or view your subscriptions in several ways.
Users must be assigned a license for Cloud Tenant access or have a subscription for Controller Tenant access. When a non-administrative user is assigned a Tenant license or subscription, they become a License Admin.

To find a specific Cloud Tenant License, perform one of these actions:
- Click Name to sort and scroll through the list of Tenants.
- Use Search to filter the list.
To launch a Cloud Tenant, perform one of these actions:
- Click
 on the row of a select Tenant and click Launch AppDynamics.
 - Click
 and select a Tenant from your profile summary list, or select View All.
To find a specific Controller Tenant subscription, perform one of these actions:
- Click certain table headings to sort and include other Tenants in the summary view.
- Use Search subscription to filter the list.
- Click View all subscriptions to display the full list.
To launch a Controller Tenant, perform one of these actions:
- Click a subscription Name or click on the row of a select Tenant and click Launch AppDynamics.
- Click and select a Tenant from your profile summary list.
Open Support Tickets
This section displays summary information for up to three open support tickets. Use this area to access the AppDynamics Help Center and create new support requests.
If you don't see a particular ticket in the summary, click View more in Support to see all tickets in Zendesk.
To review current support tickets:
- Click a support ticket to view its details.
- Click My activities to access the Requests page.
- View your support tickets, open a new one, or browse account tickets.
- Search requests or sort by Status to filter the view.
To open a new support request:
- Click View more in Support and select Submit a request.
- Select a Priority.
- Optionally, select a Time Zone.
- Enter the required form information
- Add files, screenshots, or other attachments that will help the support staff effectively address your issue.
- Click Submit.
A member of the AppDynamics support staff will respond to the email address used to log in as soon as possible.
To follow support ticket activity:
- Select an open ticket or click View more in Support.
- Navigate to Organization Requests and click Follow to begin receiving update notifications for open support requests.
- Click Following to review the items you are currently following.
- Select the Status dropdown to filter the list.
Review Active Professional Services
This section displays summary information for up to three licensed and currently active resource projects. If you don't see a particular resource, click View more in Resources.
The Manage Services and Contracts page provides a complete list of services and other components associated with your AppDynamics account.
Resources can include:
Review Account Details
The Account Details section displays:
- The information you provided when your company registered with AppDynamics.
- AppDynamics customer support contacts assigned to your account.
- An online tool for scheduling a 1:1 meeting with a technical consultant.
- An automated email link directed to your assigned customer success and/or sales representative.
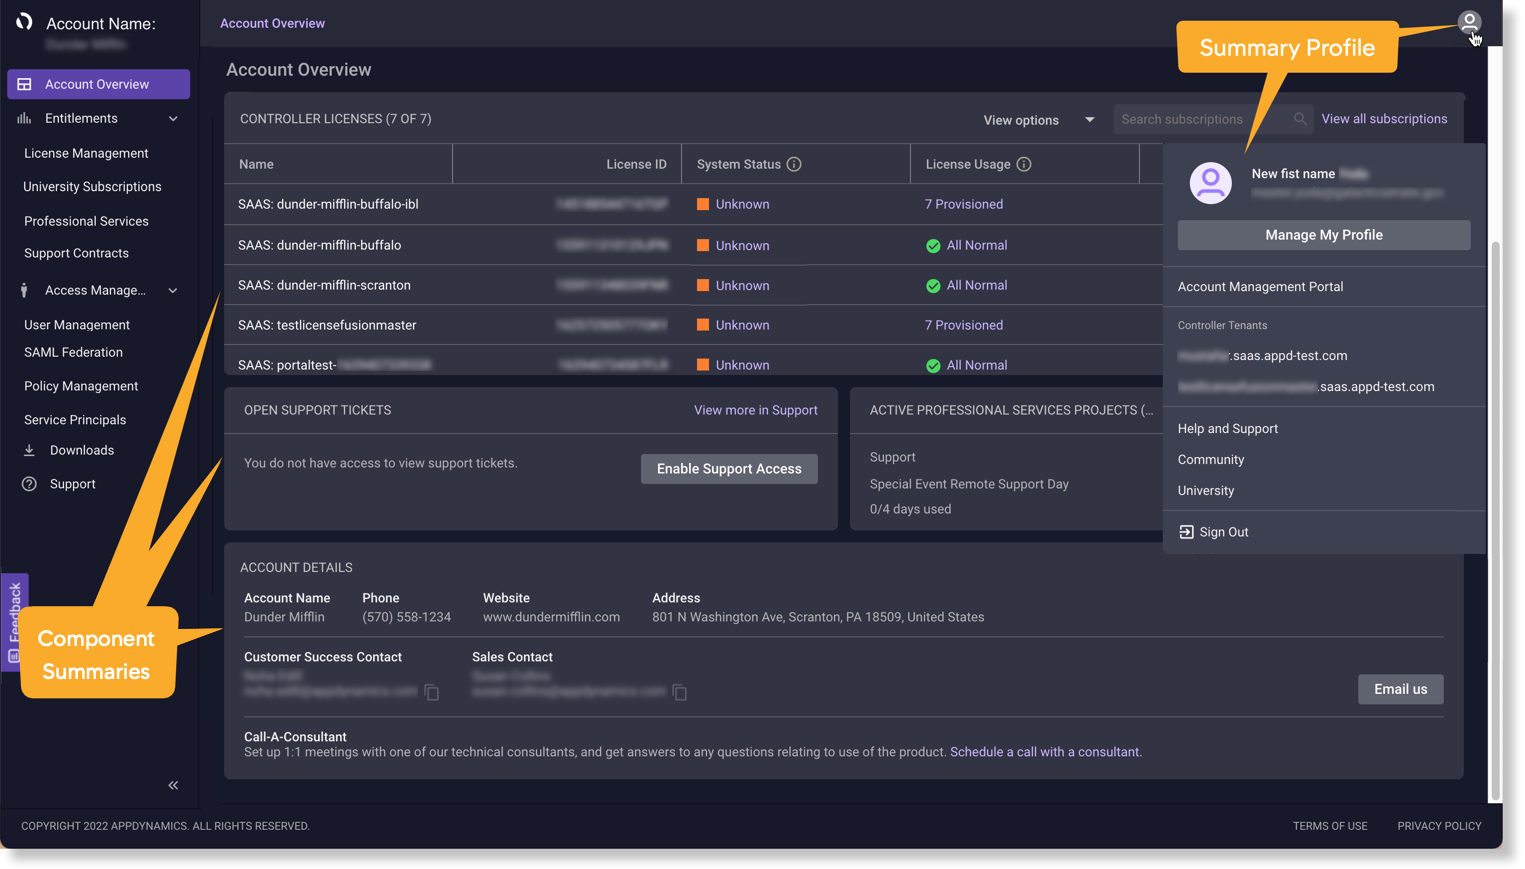
Manage Your Personal Profile
AppDynamics provides a summary profile panel for quick access to your available Tenants, Support, and other resources. To edit different aspects of your profile, click ![]() and select Manage My Profile.
and select Manage My Profile.
To edit your user details:
- Select the Personal Profile tab and click Edit.
- Update your User Details accordingly.
- Click Save.
To update your password:
- Select the Password tab and click Edit.
- Enter your current password.
- Create a new password according to the listed rules and click Save.
To customize your notifications:
- Select the Notifications tab.
- Select the Notify me when a new version of AppDynamics is released checkbox to receive emails of updates, hotfixes, and new releases.
- Select the checkbox in the License Notifications column heading to receive emails whenever a license detail changes for all associated licenses.
Alternatively, you may select individual license names to reduce notifications.

The primary contact must receive license notifications. Click Email Us in Account Details to contact your AppDynamics support representative to change the primary contact.
- Select the checkbox in the Maintenance Notifications column to receive emails when planned maintenance or outages occur.
- Alternatively, you may select individual license names to reduce notifications.
- Click Save.
Once finished with your edits, click ![]() and select Account Management Portal to return to the Account Overview page.
and select Account Management Portal to return to the Account Overview page.