Download PDF
Download page Configure API Monitoring Jobs.
Configure API Monitoring Jobs
This page describes how to configure an API monitoring job.
You can configure these details for an API monitoring job:
- Schedule when, where, and how often a job runs.
- Set timeouts.
- Set performance thresholds to trigger warning and critical events.
Create a Job
- On the Controller UI, click User Experience > API Monitoring.
- Click Add Collection and specify a collection name.
- Click Add.
- Select the newly created collection and add a job.
A new job configuration page appears; proceed with the following steps:
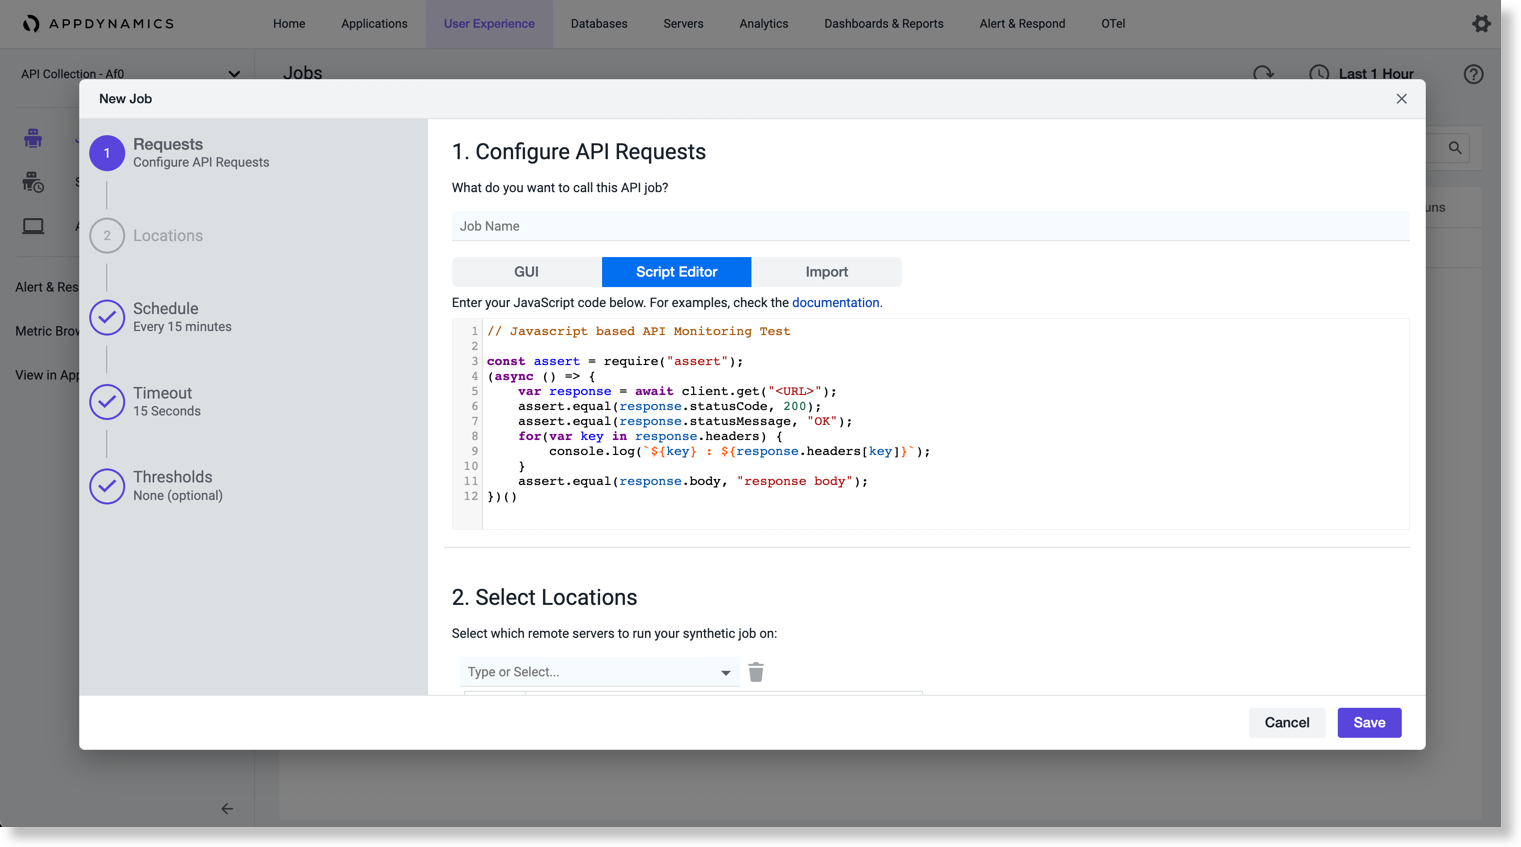
Configure API Requests
Specify a name for the API job, and then you can configure API requests through one of the following options:
GUI
If you do not want to manually create JavaScripts for configuring jobs, the GUI option provides an easy way to configure jobs.
Click GUI and configure an API request:
The API Requests pane on the left displays the API request that you configure. The API request that you create is named Request 1, you can edit the name later from the API requests list view.
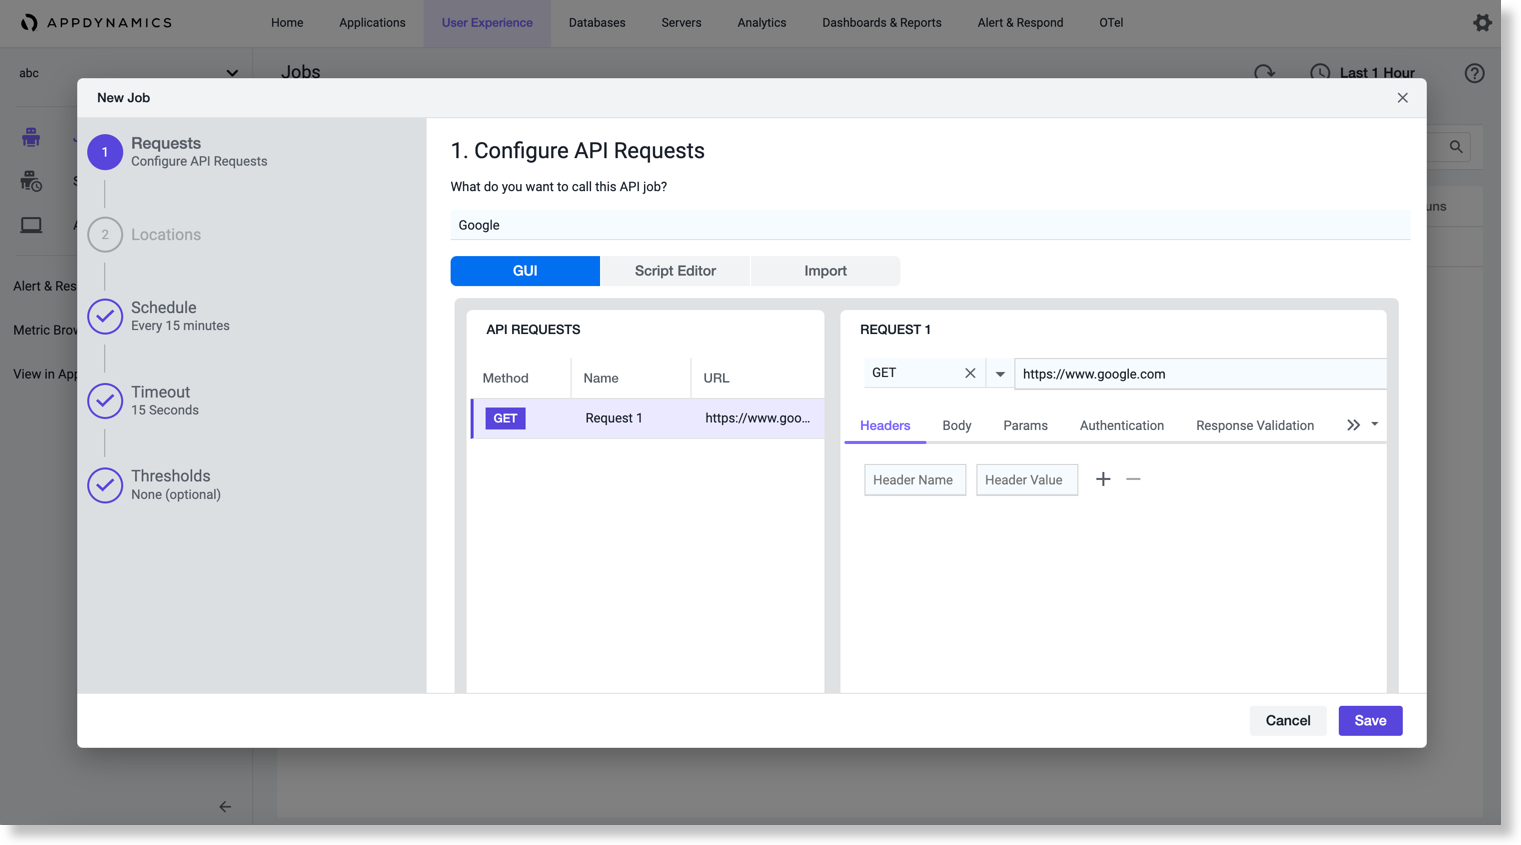
- Select an HTTP method from the right pane. The supported methods are
GET,POST,PUT, andDELETE. - Specify the URL to which you want to make the API call.
- Specify the following details based on the method type:
Tabs Description Header Enter a header name and value as key-value pair. Body XML and JSON body types are supported.
Select a body type and enter the details. For example:
{ title: "foo" body: "bar", userId: 100, }JSONParams Enter the parameter that you want to query along with the value.
Authentication The following authentication types are supported:
- Basic Auth: Specify the username and password.
- Token: Specify the bearer token.
- No Auth: No value is required.
You can also store your secrets in the Synthetic Credential Vault.
Response Validation
You can validate the response by adding assertions.
For example, when you select Status Code, =, and enter the value as
200, then the job will be successful only when the status code is 200. Similarly, you can add multiple assertions, such as response content, and response time.Initialise
You can create initial variables. Specify a variable name and a value. Then you can use it using the following syntax:
{{<variable-name>}}CODESettings Select the Follow Redirects option if the API redirects to another API.
When you enable Follow Redirects, you can specify the maximum number under Follow Redirects count. This indicates the number of redirects that are checked for the particular URL.
Create JavaScript
Create a JavaScript for your job and enter it in the Script Editor.
For sample JavaScripts for API Monitoring, see JavaScript.
Import API Collection from Postman
You can import the API collections of Postman to the API monitoring jobs.
Instead of manually creating the API collections again on Controller, you can import the existing API collections of Postman.
You must first export the API collection as a JSON file from Postman, and then import the JSON file to API Monitoring jobs. Choose the recommended Collection v2.1 while exporting. Exporting the file as Collection v2 is not supported.
Perform the following steps to import the Postman collections:
- Click Import > Choose File, and then select the API collection JSON file that you exported from Postman.
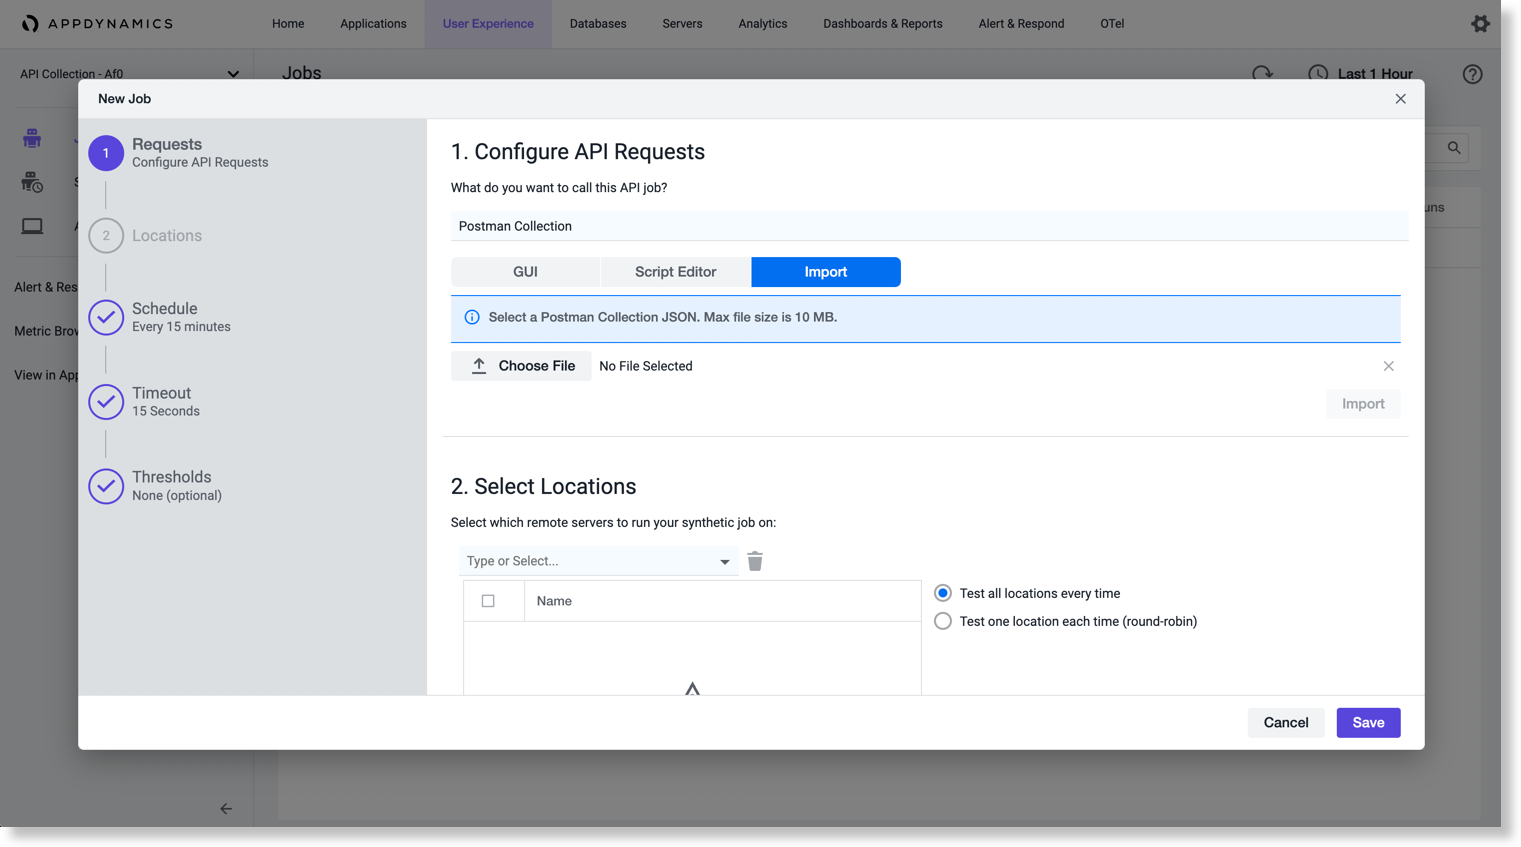
- Click Import.
When you get the success message, review the script on the Script Editor tab.

Any string enclosed with double curly brackets {{ }} is a variable. You must replace the variable manually with an appropriate value.
You can verify if the collections are imported by navigating to User Experience > API Monitoring.
Select Locations
You can select one or more locations in which the job runs. You can configure the job to test all of the locations every time or one location each time the job runs. For a complete list of Synthetic Agent locations, see Synthetic Agent Locations.
Use the hosted agents to monitor public API endpoints. You can use hosted agents to monitor the API jobs from locations where the real API traffic or request is generated.
Use the private agents to monitor the private APIs. For example, APIs used within a customer network.
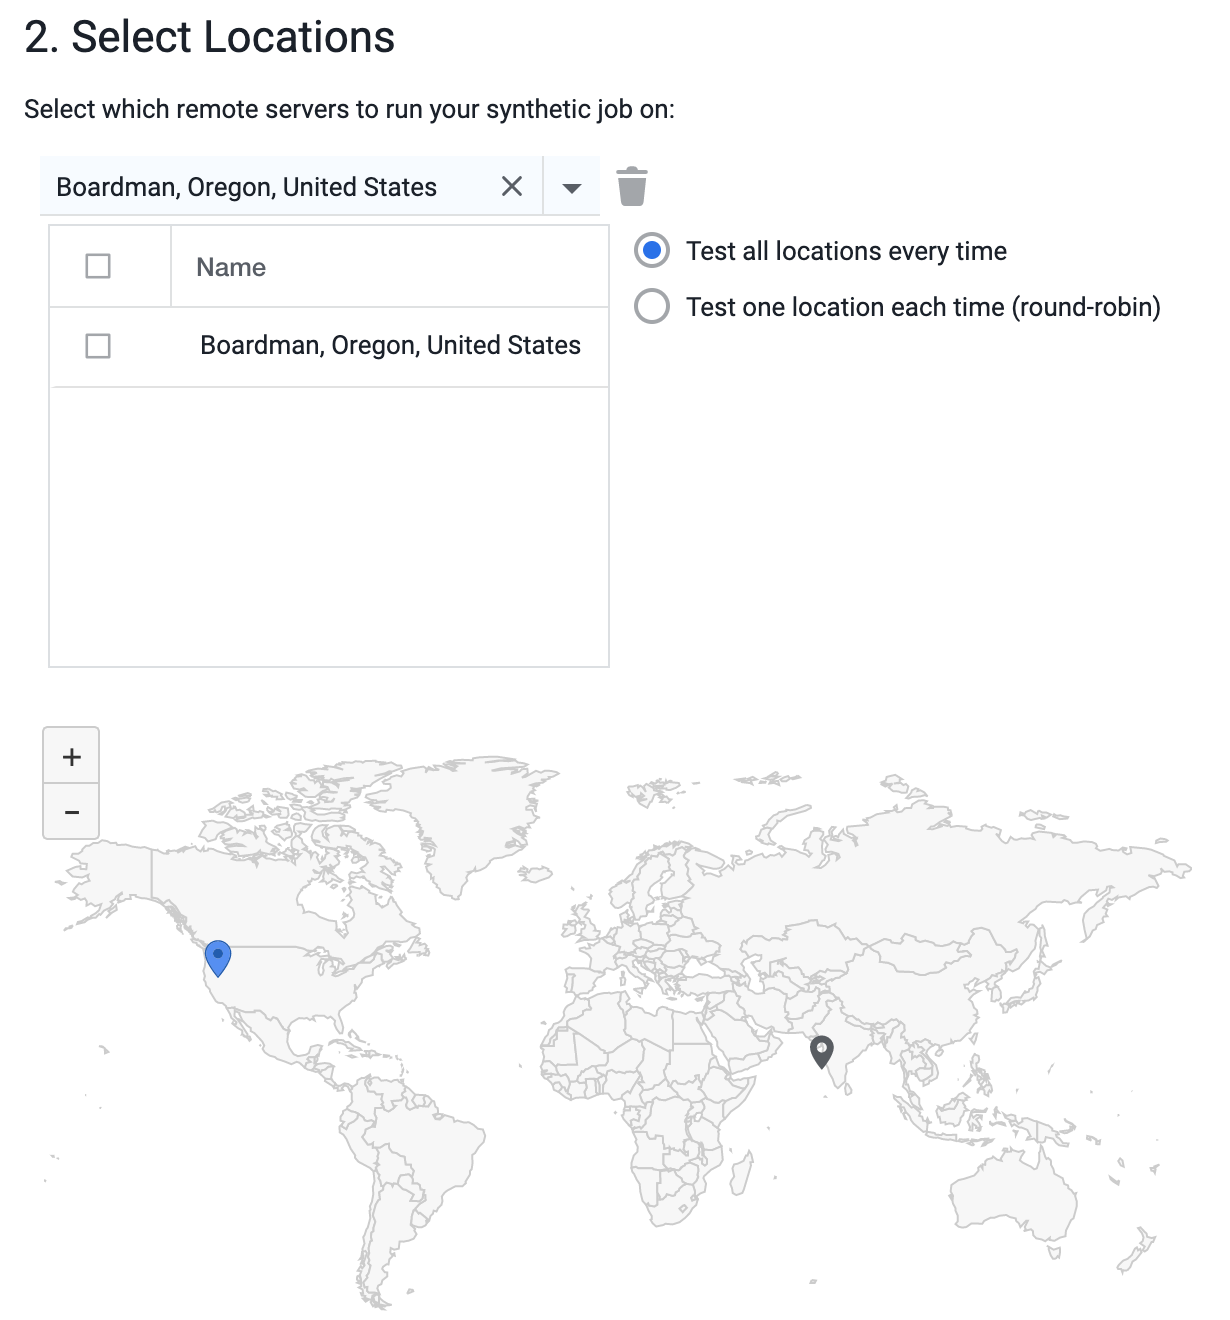
The Hosted Agent Locations are where AppDynamics hosts public synthetic agents. AppDynamics has hosted agents in 17 locations (AWS locations only). You can execute the API monitoring jobs from these 17 hosted agent locations.
- If you have deployed an API Monitoring Private Synthetic Agent, you can choose from Hosted Agent Locations or Private Agent Locations.
The Private Agent Locations are where you host your private synthetic agents. You can set up private synthetic agents in any of these environments.
Set a Schedule
The multiple schedules feature is supported only in SaaS Controllers 22.2.0 and later versions.
You can define the job schedule when you create or edit your job.
You can create multiple schedules for the same job. Each schedule can have its own time zone, frequency, and execution interval. This allows you to execute the job in different frequencies:
| Frequency | Example |
|---|---|
| Different intervals in a day | Schedule 1: Execute the job in 1-minute frequency from 8 AM to 8 PM Schedule 2: Execute the job in 5-minute frequency from 8:01 PM to 7.59 AM |
| Different days of the week | Schedule 1: Execute the job in 1-minute frequency on weekdays Schedule 2: Execute the job in 5-minute frequency on weekends |
| Different time zones | Schedule 1: Execute the job in 1-minute frequency from 8 AM to 8 PM in the PST time zone Schedule 2: Execute the job in 5-minute frequency from 8 AM to 8 PM in the BST time zone |
| Different date interval | Schedule 1: Execute the job in 1-minute frequency from February 21, 2022, to March 31, 2022 Schedule 2: Execute the job in 5-minute frequency from April 1, 2022, to March 31, 2026 |
You can create a maximum of three schedules per job.
Click Add Schedule to configure another schedule for the same job. You must create at least one schedule.


You can prevent the execution of jobs during the maintenance period.
Let us assume you have a four-hour maintenance period on March 21, 2022 (1:01 AM - 5:00 AM). Then, you can configure multiple schedules as follows:
- Schedule 1: Execute the job in 1-minute frequency from 8:00 AM on February 21, 2022, to 1:00 AM on March 21, 2022
- Schedule 2: Execute the job in 1-minute frequency from 5:01 AM on February 21, 2022, to 12:00 AM on March 21, 2026
Set Timeout Period
You can configure timeout to make the jobs fail if the time taken to execute the jobs exceeds a certain duration. By default, the API jobs timeout if the job execution does not complete within 5 minutes.
A job that fails because of timeout is considered an availability issue.

Configure Performance Thresholds
This is an optional step. You can configure performance thresholds that will trigger warning or critical synthetic events when the thresholds are exceeded.
Availability Configuration
API jobs failure irrespective of the reason, namely, invalid status code, response content validation, response size validation, and so on, are configured to be reported as an availability event by default. To avoid false positives, you can configure to re-test the jobs a specific number of times before triggering the events.
Performance Events
You can configure API jobs to trigger warning or critical error events based on the response time of the API jobs. To avoid false positives, you can configure to re-test the jobs a specific number of times before triggering the events.

For storing credentials in the Synthetic Credential Vault, see Synthetic Credential Vault for Web Monitoring.