Download PDF
Download page Controller Tenant Overview and Administration.
Controller Tenant Overview and Administration
This page describes the features of the AppDynamics Controller Tenant UI, which is the primary interface you use to monitor, troubleshoot, and analyze your entire application landscape from backend infrastructure/servers to the end user's application.
Controller Tenant UI Overview
Supported Web Browsers
The AppDynamics Controller Tenant UI is an HTML5-based browser application that works best with the latest version of any modern browser.
The Controller Tenant UI supports the latest versions of these browsers:
- Firefox
- Google Chrome
- Internet Explorer
- Microsoft Edge
- Safari
Because certain types of ad blockers can interfere with features in the Controller Tenant UI, we recommend disabling AdBlock during use to avoid issues loading particular screens.
General Navigation
As you start using the Controller Tenant UI, it is helpful to familiarize yourself with the most commonly-used elements that we reference frequently in this documentation.
The precise controls and features available to you depend on your user account permissions and product module licenses. For example, you can have additional controls in application monitoring screens with an Analytics license. See Manage Custom Roles for Cisco AppDynamics.
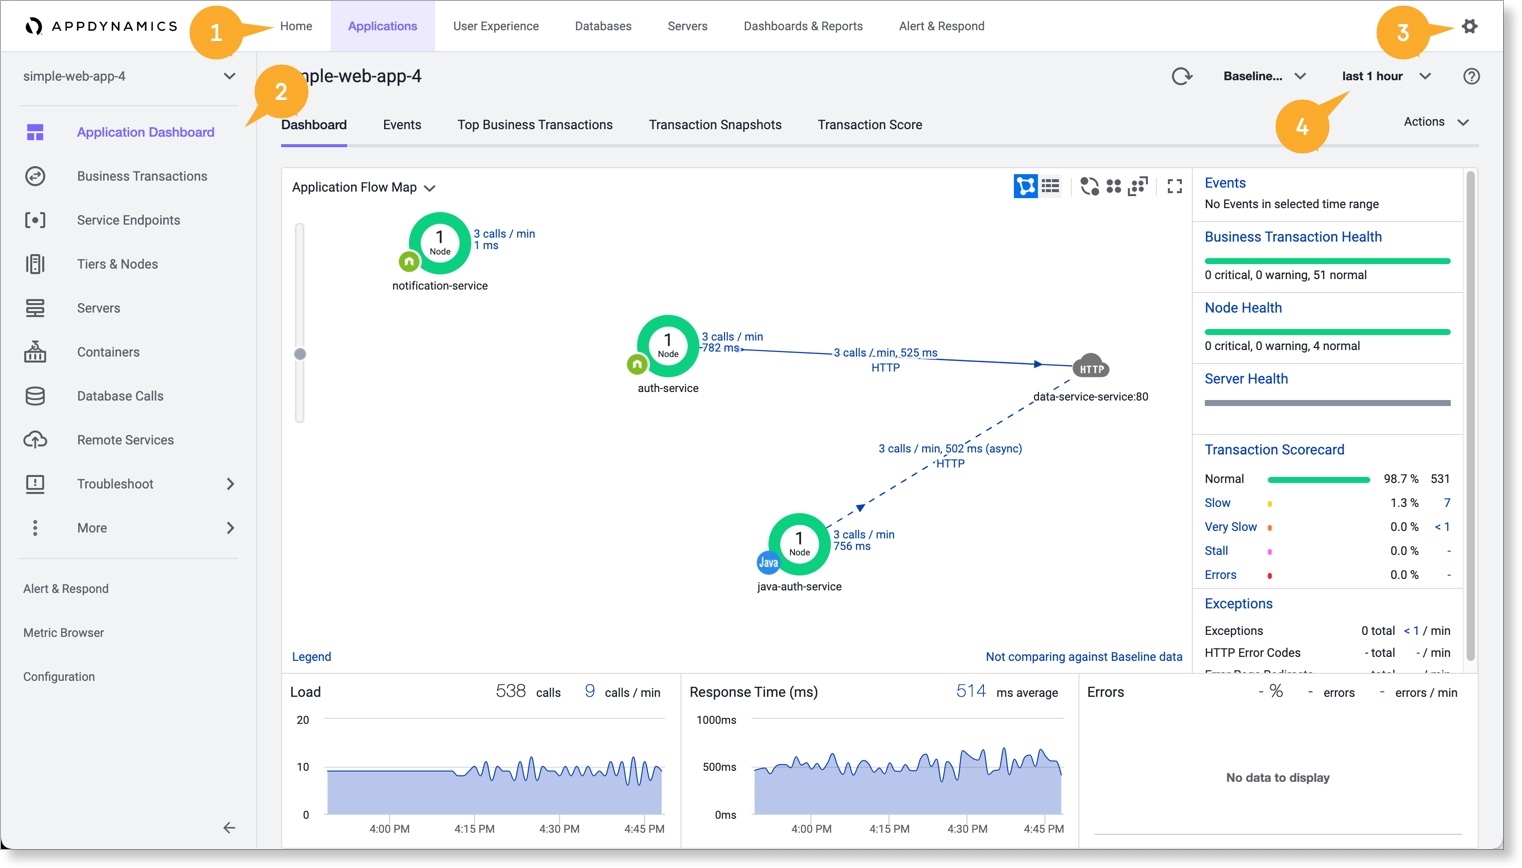
Controller Tenant UI elements include:
- Top Navigation Bar
 —use to navigate the product and cross-product feature areas, such as Alert & Respond and Dashboard & Reports.
 - Left Navigation Menu
 —use to access sections specific to the product area.
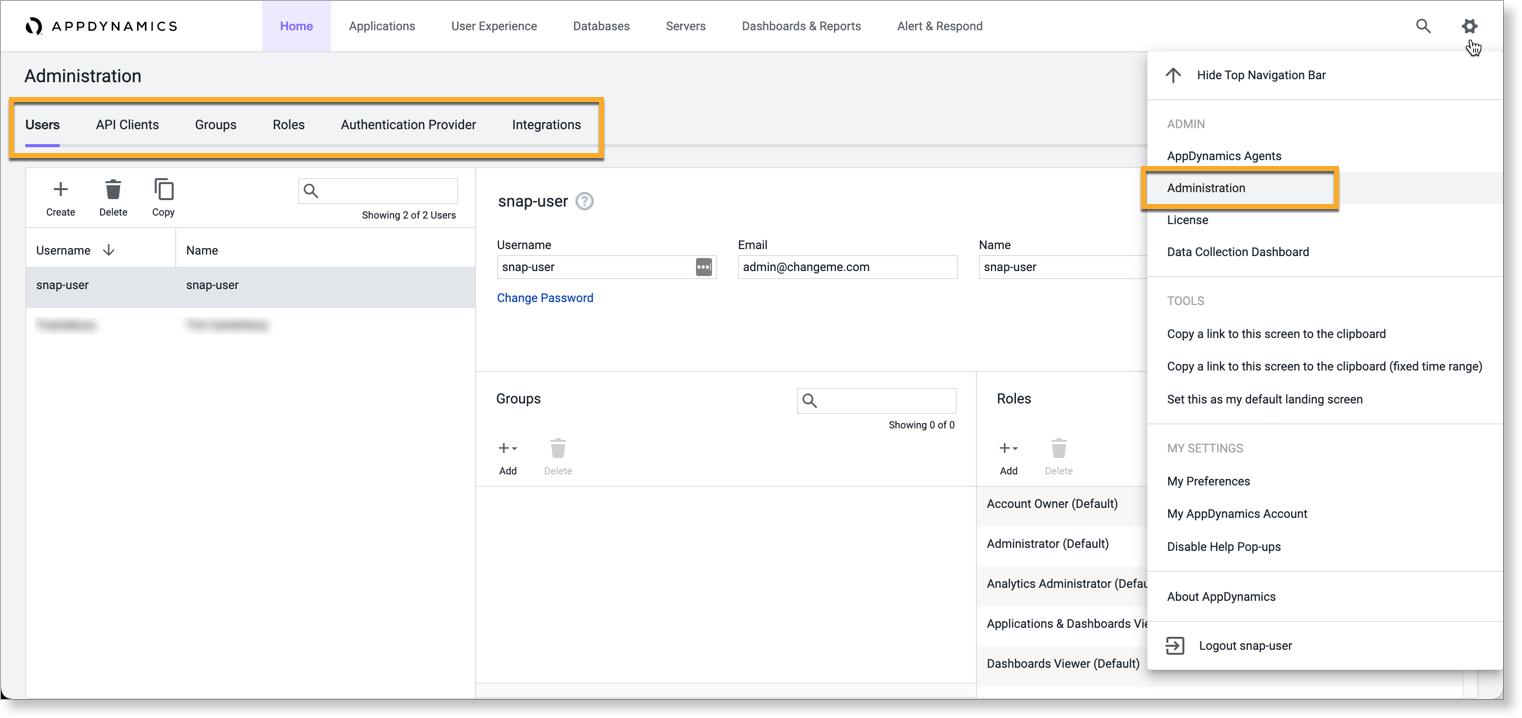
 - Settings Menu
 —access pages where you can customize the UI environment, view your account information, or, if permitted by your user role, configure administration settings such as adding user accounts, configuring authentication, and more. See Manage Controller Tenant Users and Groups.
 - Time Range Menu
 —controls the time period for the metric data AppDynamics represents. See Time Ranges and Settings.
Administration Settings Overview
You can use the Controller Tenant UI to create and administer users specific to that Tenant. Use the Account Management Portal for global user account administration and Controller Tenant license subscription assignments.

- Users—Create and administer users.
- API Clients—Create and use an API Client to provide secure access to the Tenant through REST API calls. See API Clients.
- Groups—Create and use groups to assign and manage roles for users collectively.
- Roles—Create and use roles to define user privileges in the Tenant UI.
- Authentication Provider—Configure external authentication settings for the tenant user. See LDAP Authentication or SAML Authentication.
- Integrations—Set up extension integrations to supplement AppDynamics capabilities. See Integration Modules.
Time Ranges and Settings
The Time Range menu is continuously available. Your selection determines the range of data the UI displays, except in the case of pages such as the Scalability Analysis, where other time contexts apply. When you choose a new time range, it remains the active range as you navigate to other pages.
You can select a default Standard time range or enter a Custom range. Custom time ranges can be set to terminate in the past, making them useful for analyzing trends over time.
To create a custom time range:
- Click Custom and select
 .
. - Enter a Name and optional Description.
- Enter your start and end date and time selections in the dialogues.
- Click Save.
- Optionally, select Share with Everyone to share the range with all the other users of the Tenant.
To manage a custom time range:
- Click Custom and select
 .
. - Select a time range.
- Select to Add, Edit, Delete, or Copy.
- Click Apply
 to save the changes and update the session.
To enable 5 and 15-minute auto-refresh for a flow map:
- Select Standard.
- Select 5 or 15 minutes to display the Auto-refresh checkbox at the bottom of the list.
- Select the Auto-refresh checkbox to automatically refresh the data.
Share Views With Other Users
Troubleshooting an application issue is often a collaborative effort that may involve multiple users. You can share a particular view of the Controller Tenant UI with a shareable URL that retains the currently active time range. A time range that is relative to the current time, such as "last 15 minutes," displays as a fixed time range in the sharable URL.
To share a view:
- Select Settings
 > Copy a link to this screen to the clipboard.
 - Paste and share the URL.