Download PDF
Download page Install the AppDynamics Azure Site Extension for .NET.
Install the AppDynamics Azure Site Extension for .NET
You can use the Microsoft Azure Portal to add the AppDynamics Azure Site Extension to your Azure App Service web app. Azure Site Extension is used by Ops teams that may not have access to source files, or would not like to modify or recompile them, yet still want to monitor their Azure projects and solutions.
Prepare to Install
To install the AppDynamics for Microsoft Azure Site Extension, you need:
- Connection information for your AppDynamics Controller. See Agent and Controller Compatibility.
- A Microsoft Azure account.
- An Azure web app to monitor.
If you are upgrading from a previous version, see Upgrade the AppDynamics Azure Site Extension.
Add the AppDynamics Azure Site Extension
Add the AppDynamics Azure Site extension as you would any site extension for any Azure web app.
- Log in to the Microsoft Azure Portal.
Browse to your web app.

To configure the .NET Agent using environment variables, add the environment variables before you install the AppDynamics Azure Site Extension. See Configure the Agent Using Environment Variables.
- From the DEVELOPMENT TOOLS list, click Extensions.
- Click +Add to install the version of the AppDynamics Azure Site Extension you want to add to your web app.
After you install the AppDynamics Azure Site Extension, it appears in the installed extensions list.
Add the AppDynamics Azure Site Extension Using an ARM Template
You can deploy the AppDynamics Azure Site Extension to Azure App Services using an Azure Resource Manager (ARM) template.
The following procedure uses Visual Studio Community 2017.
To create and deploy an ARM template:
- From your web application in Visual Studio, select File > New Project.
- Click Cloud, then click Azure Resource Group, then click OK.
- From the Select Azure Template dialog, click Web App, then click OK.
- Under your newly-created Resource Group, click the Website.json file.
- Under JSON outline in the left pane, right-click resources, then select Add New Resource.
- In the Add Resource dialog box, select Application Settings for Web Apps, enter a name, then click OK.
- Under the properties section, enter your AppDynamics Controller information. The following example shows the Website.json file with the application properties for AppDynamics.
- Add a new apiVersion section with your Azure Site Extension details:
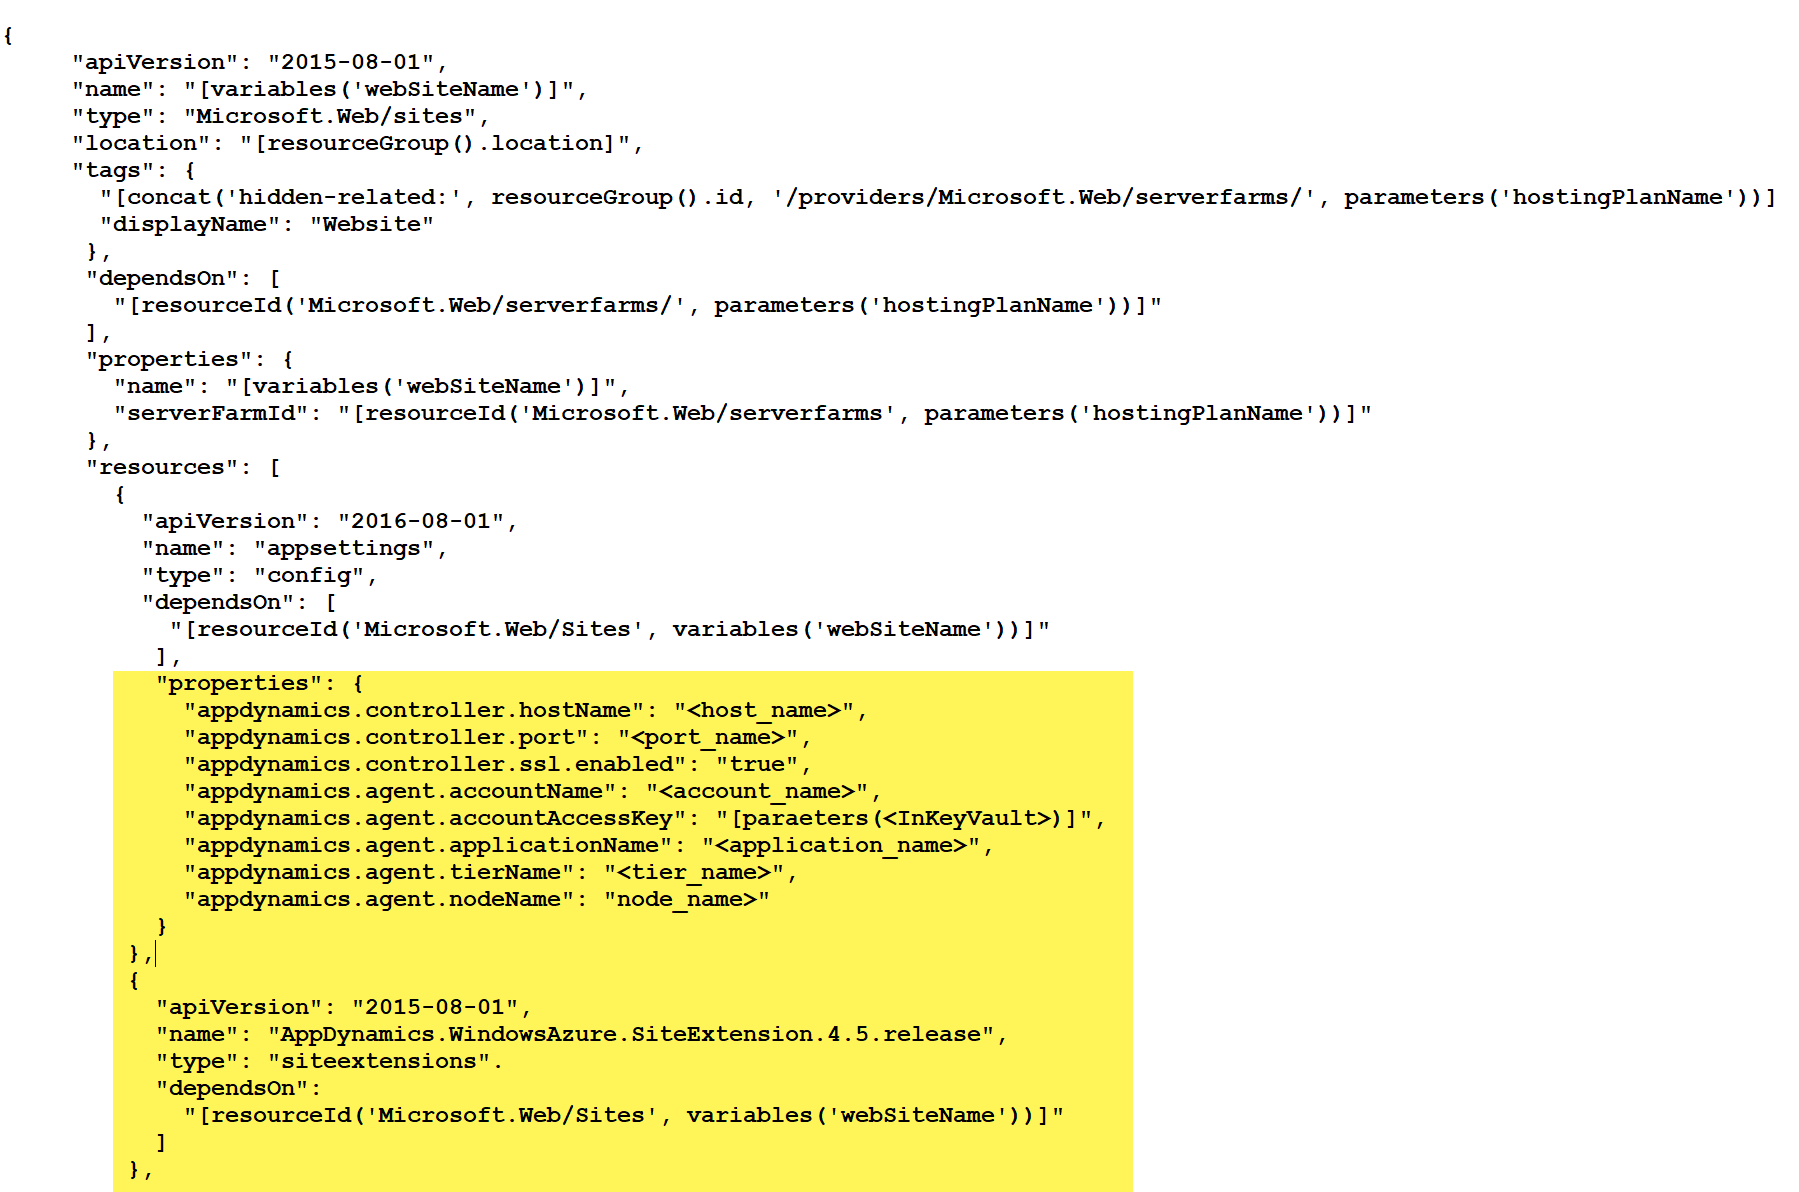
Here is the sample text for copying or pasting:
{
      "apiVersion": "2015-08-01",
      "name": "[variables('webSiteName')]",
      "type": "Microsoft.Web/sites",
      "location": "[resourceGroup().location]",
      "tags": {
        "[concat('hidden-related:', resourceGroup().id, '/providers/Microsoft.Web/serverfarms/', parameters('hostingPlanName'))]": "Resource",
        "displayName": "Website"
      },
      "dependsOn": [
        "[resourceId('Microsoft.Web/serverfarms/', parameters('hostingPlanName'))]"
      ],
      "properties": {
        "name": "[variables('webSiteName')]",
        "serverFarmId": "[resourceId('Microsoft.Web/serverfarms', parameters('hostingPlanName'))]"
      },
      "resources": [
        {
          "apiVersion": "2016-08-01",
          "name": "appsettings",
          "type": "config",
          "dependsOn": [
            "[resourceId('Microsoft.Web/Sites', variables('webSiteName'))]"
          ],
          "properties": {
            "appdynamics.controller.hostName": "mycompany.saas.appdynamics.com",
            "appdynamics.controller.port": "443",
            "appdynamics.controller.ssl.enabled": "true",
            "appdynamics.agent.accountName": "mycompany",
            "appdynamics.agent.accountAccessKey": "[parameters('AppDAccessKeyInKeyVault')]",
            "appdynamics.agent.applicationName": "HelloWorldSecureAppDKey",
            "appdynamics.agent.tierName": "TestTier",
            "appdynamics.agent.nodeName": "TestNode"
          }
        },
        {
          "apiVersion": "2015-08-01",
          "name": "AppDynamics.WindowsAzure.SiteExtension.4.5.Release",
          "type": "siteextensions",
          "dependsOn": [
            "[resourceId('Microsoft.Web/Sites', variables('webSiteName'))]"
          ]
},Configure the Controller Connection
You have the following options to configure the .NET Agent to connect to the AppDynamics Controller:
- Configure the Controller connection using the Kudu console.
- Configure the Controller connection settings using environment variables.
See Agent-to-Controller Connections.
Configure the Agent with the Kudu Console
When you add the AppDynamics Azure Site Extension to your web app, you can interactively configure the .NET Agent using the Kudu Console.
- Navigate to the AppDynamics Controller Configuration page in the Kudu Console:
http://{web app}.scm.azurewebsites.net/appdynamics/
For example: https://myazureexample.scm.azurewebsites.net/appdynamics/ - On the AppDynamics Controller Configuration page, enter your Controller connection information. For example:

- Click Validate to test the connection to the AppDynamics Controller and save your settings.
- Restart your web app.
After you apply some load to your web app, you can view it on flow maps in the AppDynamics Controller UI.
Configure the Agent Using Environment Variables
You can use environment variables to configure the .NET Agent for unattended configuration.
To configure .NET Agents, add the environment variables before you install the AppDynamics Azure Site Extension:
- Navigate to SETTINGS > Application Settings for your web app.
- Add the .NET Agent environment variables under App settings:
- appdynamics.controller.hostName: address for the AppDynamics Controller
- appdynamics.controller.port: Controller port
- appdynamics.agent.accountName: account name you use to log in to the Controller
- appdynamics.agent.accountAccessKey: account key you use to log in to the Controller
- appdynamics.agent.applicationName: business application name in the Controller
- appdynamics.controller.ssl.enabled: set to
Trueto enable SSL connection to the Controller; otherwise set toFalse. appdynamics.proxy.hostName: name of the proxy host
- appdynamics.proxy.authDomain: (Windows only) domain name of the proxy server
appdynamics.proxy.port: port number of the proxy
appdynamics.proxy.authName: name of the user who connects to the proxy
appdynamics.proxy.authPassword: password of the user who connects to the proxy
appdynamics.enable.tls12: set to True to enable transport layer security (TLS) 1.2; otherwise set to False.
- Restart your web app. After you apply some load to your web app, you can view it on flow maps in the AppDynamics Controller UI.
Specify Which WebJobs to Monitor
Use the APPDYNAMICS.PROCESSLIST environment variable to specify which WebJobs the .NET Agent monitors.
Environment Variable: APPDYNAMICS.PROCESSLIST
Type: Strings separated by "|"
Default: None. When undefined, the agent instruments all WebJob running in the app service. When defined, the .NET Agent instruments only the specified processes.
Required: No
Usage Cases:
- Environment 1: An Azure app service with no WebJobs, where the Appdynamics .NET Agent site extension is installed and configured. After defining the environment variable
AppDynamics.ProcessListwith the valuew3wp.exe, theDaasrunner.exeWebJob, which is a default WebJob that is added to all app services, is not instrumented. - Environment 2: An Azure app service, with two WebJobs,
webjob1.exeandwebjob2.exe, where the Appdynamics .NET Agent site extension is installed and configured. After defining the environment variableAppDynamics.ProcessListwith the valuew3wp.exe, only the worker process serving the actual web app will be instrumented and no WebJobs will be instrumented. With the environment variable value set tow3wp.exe|webjob1.exe, the worker process serving the web app and the webjob1.exe are instrumented, but the webjob2.exe is not instrumented. With theAppDynamics.ProcessListremoved from the App settings of the Azure app service, all the WebJobs, includingDaasrunner.exeare are instrumented, including the worker process serving the web app.
Upgrade the AppDynamics Azure Site Extension
When you click on the Extensions tab for your web app, the Microsoft Azure Portal displays the currently installed version of the AppDynamics Azure Site Extension. The Update Available column of the installed extensions list indicates if there is a more recent minor release of the .NET Agent available. If so, you can click to update the extension from the list.
Upgrade a Major Version of the .NET Agent
AppDynamics maintains major release versions of the .NET Agent as separate site extensions. Therefore you need to uninstall the installed version of the AppDynamics Azure Site Extension before you upgrade to a new major release:
- Log in to the Microsoft Azure Portal.
- Stop your web app.
- Click on the AppDynamics Azure Site Extension from the list of installed extensions and click Delete to uninstall it.
- Install the new version of the AppDynamics Azure Site Extension as normal.
If you are upgrading from .NET Agent 4.2 and you used environment variable configuration, you must update your web app environment variables. See configure the agent using environment variables. Note that the APPD_UNATTENDED variable is no longer required.