Download PDF
Download page Host a Geo Server.
Host a Geo Server
AppDynamics hosts a Geo Server that resolves the user's geographic location based on the request's reported IP address. You may prefer to host your own Geo Server if:
- You have intranet applications where the public IP address does not provide meaningful location information but the user's private IP does.
- You have a hybrid application where some users access the application from a private location and some access it from a public one. If a user doesn't come from a specific private IP range mapped by the custom geo server, the system can be set to default to the public Geo Server.
The custom Geo Server supports an HTTP header, AD-X-Forwarded-For. You can use this to declare an IP address specifically for the purpose of geo resolution. Custom Geo Server also supports the HTTP header X-Real-IP.
To host a custom geo server:
Requirements for Geo Server Host
- 2 GB of memory
- Java 8.x
Download and Install the Geo Server File
Download the GeoServer.zip file from AppDynamics at https://download.appdynamics.com/download.
Uncompress the zip to a GeoServer folder with the following structure:
 ├── GeoServer
   ├── schema.xsd                    <-- schema for geo-ip-mapping.xml configuration
   ├── geo
   │   ├── WEB-INF
   │   │   ├── classes
   │   │   │   ├── logback.xml       <-- configure logging in here
   │   │   │   └── ...
   │   │   ├── web.xml               <-- other configurations here
   │   │   └── ...
   |   ├── geo-ip-mappings.xml       <-- configure geo ip mapping here
└── ...To install the geo server, copy the geo folder to the TOMCAT_HOME/webapps of your Tomcat server. Do not deploy the server in the same container as the Controller.
Set the Location of the Geo Server
Enter the URL, including the context root, of your hosted geo server in the Geo Server URL field in the Browser RUM configuration screen in the Controller UI as shown below.

![]() If you are using manual injection for your JavaScript agent, you must make sure that the copy of the script that you use is one that you have downloaded after this URL is set.
If you are using manual injection for your JavaScript agent, you must make sure that the copy of the script that you use is one that you have downloaded after this URL is set.
Create the IP Mapping File
The geo-ip-mappings.xml IP mapping file specifies the locations for which Browser RUM provides geographic data. It maps IP addresses to geographic locations.
Use the sample file in the geo subdirectory as a template. Any modifications at runtime are reloaded without a restart.
This file contains a <mapping> element for every location to be monitored. The file has the following format.
<mappings>
	<mapping>
		<subnet from="192.168.1.1" mask="255.255.255.0"/>
		<location country="United States" region="California" city="San Francisco"/>
	</mapping>

	<default country="United States" region="California" city="San Francisco"/>
</mappings>
You can also use IP-range-based mapping instead of subnet-based:
<mapping>
    <ip-range from="10.240.1.1" to="10.240.1.254" />
    <location country="France" region="Nord-Pas-de-Calais" city="ENGLOS" />
</mapping>
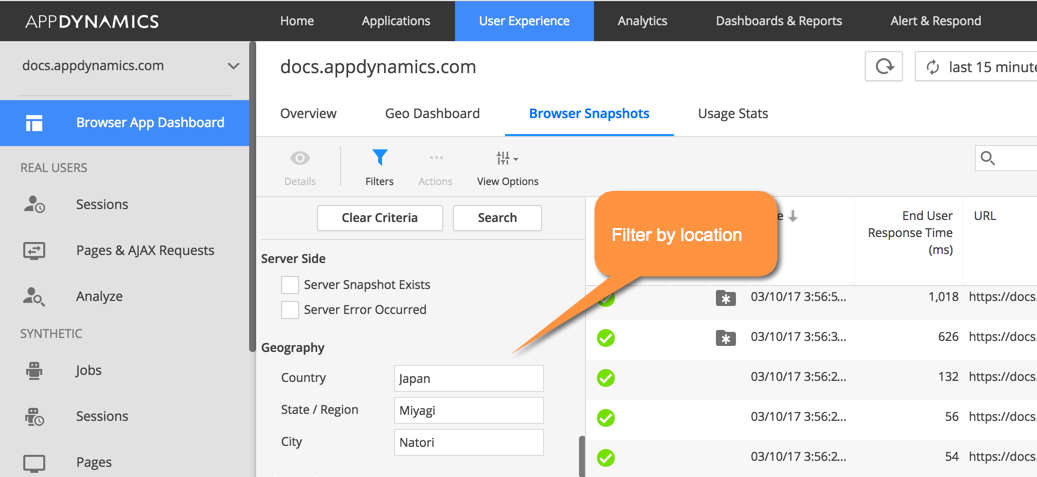
This data is visible in browser snapshots and can be used to filter browser snapshots for specific locations: The <country>, <region>, and <city> elements are required. If the values of <country> and <region> do not correspond to an actual geographic location already defined in the geographic database, map support is not available for the location in the map panel, but Browser RUM metrics are displayed for the location in the grid view of the geographic distribution, end user response time panel, trend graphs, browser distribution panel, and in the Metric Browser. The <city> element can be a string that represents the static location of the end-user. You will notice a <default> element. If there is an IP address that is not covered by your IP mapping file, this is the value that is used. To use a public geo server for non-covered IP addresses, see Using a Hybrid Custom-Public Geo Server Setup.
The valid names for country and region are those used in the map in the geo dashboard. You can hover over a region in the dashboard to see the exact name (including spelling and case) of the region. See The Browser Geo Dashboard View.
Using a Hybrid Custom-Public Geo Server Setup
If you want Browser RUM to evaluate any non-mapped IP address using the public geo server, remove the <default> element. In this case, locating any non-mapped IP address is done in the EUM cloud, not locally.
Customize File Locations
You can customize where certain files are stored in the GeoServer directory.
Change Log Location
By default, logs are written to TOMCAT_HOME/logs, but you can configure this using TOMCAT_HOME/webapps/geo/WEB-INF/classes/logback.xml. Open the file with a text editor and edit the LOG_HOME property.
<property name="LOG_HOME" value="{path-to-file}/logs"/>Change Mapping File Location
By default, the geo server looks for geo-ip-mappings.xml in TOMCAT_HOME/webapps/geo/. To change the location, open TOMCAT_HOME/webapps/geo/WEB-INF/web.xml with a text editor and change value for AD_GEO_CONFIG_FILE.
<web-app ...>
    <!-- ... -->
    <servlet>
        <servlet-name>FrontControllerServlet</servlet-name>
        <servlet-class>com.appdynamics.eum.geo.web.FrontControllerServlet</servlet-class>
        <context-param>
            <param-name>AD_GEO_CONFIG_FILE</param-name>
            <param-value>{path-to-file}/geo-ip-mappings.xml</param-value>
        </context-param>
        <!-- ... -->
    </servlet>
    <!-- ... -->
</web-app>![]() In previous versions of the geo server, the enclosing tag was a
In previous versions of the geo server, the enclosing tag was a <context-param>. This has now been changed to an <init-param>.