Download PDF
Download page Getting Started.
Getting Started
Related pages:
As part of your deployment, the AppDynamics APM provides:
- A Tenant for data collection.
- A Tenant UI for data analysis.
- An online Account Management Portal to manage your account, users, subscriptions, license usage, and role functionality.
As a best practice, we recommend that you follow the Deployment Planning Guide and create a deployment plan for your environment and needs.
Create an Account
Your first step to working with AppDynamics is to create a SaaS account to fit your data security needs, application workflow, and business environment. Reviewing the Deployment Planning Guide will help you strategize.
AppDynamics has implemented restrictions and will not enter into any negotiation with, or seek to solicit any interest from, any third party in relation to the sale or use of the AppDynamics products or software or any part thereof, whether directly or indirectly with any country or region subject to an embargo including but not limited to Cuba, Iran, North Korea, Sudan, Syria, and Crimea.
Choose an account type and deployment option.
The default trial configuration is a Software-as-a-Service (SaaS) deployment hosted by AppDynamics.
- Follow this Start Free Trial link.
- Enter your information and create a secure password.
The email and password you enter will be your login throughout your AppDynamics trial experience. Therefore, it is essential that you use a valid email address.

You can skip the form and chat with a live expert by using the online chat feature.
- Agree to the terms and click Get Started.
- Click Launch AppDynamics.
The Deployment Planning Guide will help you determine how to set up your account to best suit your business. An AppDynamics customer account manager will work with your organization to determine the proper configuration.

AppDynamics does not support user or agent requests that originate from any URL other than the Tenant URL provided at registration or otherwise edited by AppDynamics. Due to system security improvements, requests from custom URLs will be rejected and may cause a service disruption.
If a custom URL is required, we recommend that you create a forward proxy in your environment.
Once AppDynamics provides a hosted Tenant, you will:
- Choose and install AppDynamics agents.
- Add users through the Tenant UI.
- Configure Email/SMS settings to enable notifications on a preconfigured SMTP server.
Gain System Access
After you complete registration and create an account, you will have access to your Account Management Portal for online account administration and, if you opted for a SaaS deployment, access to your hosted Tenant platform.
Online Account Administration
The Account Management Portal provides a secure online area where administrators can:
- Manage the company account and personal profile separately.
- Administer users, groups, subscriptions, and roles.
- Configure an Identity Provider (IdP).
- See a company overview of account details, subscription information, open support tickets, and active resource projects.
- Launch available AppDynamics Controller Tenants.
- Download agents, platforms, and product updates.
Your account type will determine the services available in the Account Management Portal. See Account Administration.
- Access the Welcome email sent to the address you used to create your account.
- Click Get Started.
- Follow the instructions.
Tenant UI
An AppDynamics Tenant is fundamental to every deployment. Integrated agents collect data from a monitored environment and send it to the Tenant. The Tenant UI is where you can view, understand, and analyze that data.
How you access your Tenant depends on your deployment. Your account will include a subscription license for each product you purchased during registration. A subscription can have one or more modules and you can have multiple subscriptions, each one having a distinct lifecycle.
Choose your deployment configuration.
When you complete registration with your valid email, the AppDynamics Operations team will use that address to send your SaaS URL and access details.
- Click the SaaS URL provided in the email.
- Enter the Account Name given in the email.
- Click Login to access your new web-based Tenant UI.
- Navigate to Getting Started > Getting Started Wizard.
- Select an agent from the Application list.
- Follow the steps to install an agent. See Install Agents.
When you complete registration with your valid email, the AppDynamics Operations team will use that address to send information about the components you need to start instrumenting your application and access your AppDynamics SaaS account.
- Follow the URL provided to log in to your web-based Tenant UI.
- Enter the Account Name and User Name given in the email.
- Create a secure password by clicking Forgot Password to have a password reset link sent to the registered email.
- Click Login.
- Navigate to Getting Started > Getting Started Wizard.
- Select an agent from the Application list.
- Follow the steps to install an agent. See Install Agents.
AppDynamics does not support user or agent requests that originate from any URL other than the Tenant URL provided at registration or otherwise edited by AppDynamics. Due to system security improvements, requests from custom URLs will be rejected and may cause a service disruption.
If a custom URL is required, we recommend that you create a forward proxy in your environment.
Install Application Agents
An AppDynamics deployment consists of multiple application agents to monitor different components in your environment. For installing most types of agents, you can use the Getting Started Wizard in the Tenant UI.
Log in to the Tenant UI and navigate to Applications > Create an Application > Create an Application using the Getting Started Wizard. Follow the instructions in the Wizard to install agents in your application environment.
Review the Install App Server Agents documentation for instructions and guidance. AppDynamics provides an Agent Installer that simplifies the agent installation process and streamlines the deployment of the Java and Machine Agents.
Connect Agents to the Tenant
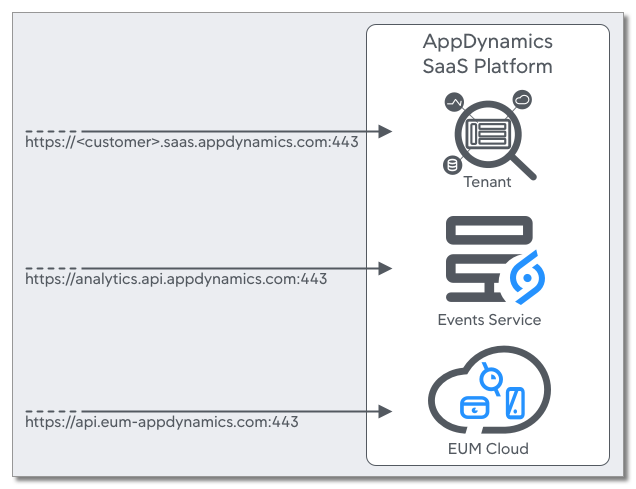
The Getting Started Wizard automatically configures settings for connecting agents to the Tenant. If you manually download agents, you must configure the Tenant connections. You may need to adjust the configuration of network components, such as firewalls or proxies, to permit traffic from the agent to the Tenant. The connection is unidirectional, meaning that agents always initiate the connections to the Tenant.
This graphic shows the connections agents use to reach the platform.
Continue with Your AppDynamics Deployment
Best Practice
We recommend that you follow the Deployment Planning Guide and create a deployment plan for your environment and needs.
You can start using AppDynamics immediately without instrumentation and configuration. Then, at a later date, you can optimize the configuration to make the best use of AppDynamics for your environment and requirements. After you install agents and restart your applications, AppDynamics automatically builds an environment of your application. You can see the model in the dashboards and flow maps view of the Tenant UI. The Tenant monitors your application workload, uses machine learning to determine what is normal for your environment, and applies sensible defaults for detecting abnormal activity and application errors.
The timeline in the Deployment Planning Guide outlines a typical start to your AppDynamics journey.
Telemetry
AppDynamics may track and collect usage metrics and other data generated through your interaction with our software to improve our product and enhance your experience.
Tutorials
Learn more about specific areas of the AppDynamics APM Platform by following one of these tutorials: