Download PDF
Download page Troubleshoot .NET Agent Issues.
Troubleshoot .NET Agent Issues
This page describes issues you may encounter when installing the .NET Agent.
Verify Agent Controller Communication
Use the AppDynamics UI to verify that the agent can connect to the Controller.
In a browser open:
http://<controller-host>:<controller-port>/controller
If you cannot connect to the Controller in Internet Explorer, see Check Internet Explorer proxy settings.
- Log in to the AppDynamics UI.
- Select the application to open the Application Dashboard.
- In the left navigation panel, select Servers > Tiers & Nodes and open the Health tab.
The Health tab lists the tiers, their nodes, and App Agent Status. When an agent successfully reports to the Controller, an up arrow symbol displays.
See Agent-to-Controller Connections.
- When deploying multiple agents for the same tier, determine if the correct number of nodes reports into the same tier.
- After sending a request to your web application, data should display on the AppDynamics UI. The agents should display in the Application Flow Map of the Application Dashboard.
If no data displays after a few minutes:
- Verify that the Agent is writing its log files.
Windows Server 2008 and later:%ProgramData%\AppDynamics\DotNetAgent\Logs\AgentLog.txt - If the log file exists, open it and review for errors.
- If the log file does not exist, run the Windows Event Viewer and review the application messages.
- If there are no AppDynamics event messages, look for messages from the .NET Runtime.
Check Internet Explorer Proxy Settings
Use this procedure to resolve issues connecting to the AppDynamics Controller when step 1 of 'Verify Agent Controller Connection' fails. To configure the .NET Agent to work through a proxy, see 'Controller Element' on .NET Agent Configuration Properties.
Misconfigured proxy settings in Internet Explorer may cause the App Agent for .NET to fail to connect to the Controller.
If the test Controller connection fails on the Controller Configuration pane in the AppDynamics Agent Configuration utility:
- Verify the Controller host and port settings are correct.
In Internet Explorer, open:
http://<controller-host>:<controller-port>/controller
- If the connection also fails in Internet Explorer, check the proxy settings. See Change IE Proxy Settings.
- Correct or remove any incorrect proxy settings.
Checklist for Resolving .NET Agent Installation Issues
Item | Notes | |
|---|---|---|
| Run the installer as Administrator. | |
| Verify that MSDTC is enabled and that it is running under the correct account. | Verify MSDTC is enabled and running under the correct account | |
| Verify permissions for Agent directory. | Verify that the .NET Agent directory has the correct permissions based on the site’s application pool identity. |
| Verify that the Agent is compatible with the Controller. | |
| Verify the correct settings in the Windows Server 2008 and later: | Update the config.xml file to include the .NET Agent Configuration Properties. |
Resolve .NET Agent Installation Issues
If the Agent installation is failing, check these configurations in your environment:
Verify Administrative Privileges
Ensure that you have administrative privileges when you launch the installer. If the current user doesn't have sufficient privileges, the installer prompts you for an administrator password.
Verify MSDTC is Enabled and Running for the Correct Account
If you encounter an error that MSDTC is not enabled or it is running for the wrong account, launch an elevated command prompt with full administrative privileges and execute this command:
msdtc -install
Even if MSTDC is already installed, this command resets the service to run using the "NT Authority\NetworkServices" account.
Generate a Log for Agent Installation Failures
If the installer fails, use this command-line utility to launch the installer:
msiexec /i $Path_to_the_MSI_File /l*v verbose.log
A verbose log for the .NET Agent is created at the same location where you saved the installer file.
Correct Failed Installation Caused by other APM Products
The .NET Agent installation may fail if there are other Application Performance Management (APM) products installed in the same managed environment. Remove the associated Environment subkey for certain services for the installed APM products.
To remove the associated environment subkey for W3SVC and WAS services in the registry:
- Run Regedit or regedt32.
- In regedit.exe, locate these registry keys:
HKEY_LOCAL_MACHINE\SYSTEM\CurrentControlSet\services\W3SVCHKEY_LOCAL_MACHINE\SYSTEM\CurrentControlSet\services\WAS - Expand the keys.
Modify the
Environmentsubkey to delete these values:COMPLUS_ProfAPI_ProfilerCompatibilitySetting=EnableV2Profiler COR_ENABLE_PROFILING=1 COR_PROFILER= {a GUID}- Restart the services. See How to restart the W3SVC and WAS services?
Resolve Configuration Errors
- Set your IIS applications to a Full trust level. .NET Agent reporting will not work if an IIS application is set to anything other than a Full trust level.
- Ensure that you have correctly configured the
config.xmlfile for the App Agent for .NET. See .NET Agent Configuration Properties. If you manually edited the
config.xmlfile, check theAgentLog.txtfile andWarnLog.txtfile for errors. Invalid XML displays in the log as:2014-03-13 10:49:18.7199 1232 dllhost 1 1 Error ConfigurationManager Error reading the configuration fileCODE- Resolve Log Issues
The .NET Agent writes logs to these directories:
%ProgramData%\AppDynamics\DotNetAgent\Logs
The agent will not generate logs if the agent directory does not have sufficient permissions.
Verify that the .NET Agent Directory has the Correct Permissions
- Select IIS > Application pools.
IIS displays the list of application pools for your machine.
- Right-click a particular application pool.
- Select Advanced Settings.

IIS displays the Application Pool Identity for that application.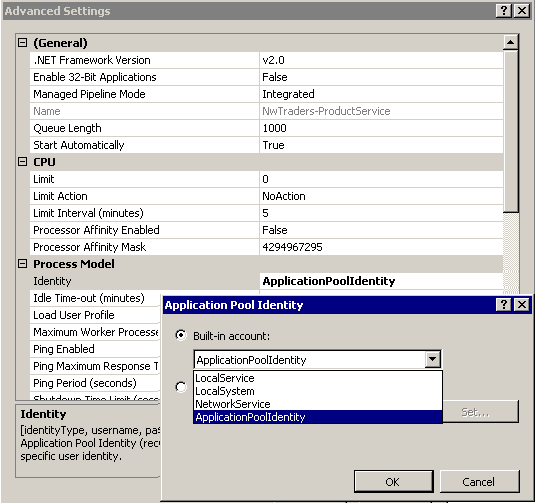
- Ensure that your Agent Directory also has the same permissions as your site application pools.
- Navigate to AppDynamics .NET App Server Agent directory location.
- Right-click the
logsdirectory for the App Server Agent and select Properties.
- Select the Security tab, and verify that the same Application Pool Identity is specified for the .NET Agent directory.

If the Agent logs directory does not have the required permissions:
- In the Security tab, select Edit.
- Select Add to add new permissions to the Agent directory.
- Select Advanced.

- Click Find Now to find all the users, groups, or built-in security principals on your machine.
- Select the required group from the list and click OK. Review the information that follows for Allowed groups.
- Provide the read and write permissions for the selected user/group/security principal to the Agent directory and click OK.
- Click Apply.
Allowed Groups for Different IIS Versions
For IIS 6.x, these settings are applicable for Application Pool Identities:
Application Pool Identity | Permission Level |
|---|---|
|
|
|
|
|
|
| Provide the exact name of the account. |
For IIS >= IIS 7.0, these settings are applicable for Application Pool Identities:
Application Pool Identity | Permission Level |
|---|---|
|
|
|
|
|
|
| Provide the group level permissions for |
| Provide the exact name of the account. |
For example, if your application has the identity ApplicationPoolIdentity, you must provide the permissions for IIS_IUSRS group to your agent directory.

Another Version of AppDynamics Detected
AppDynamics recommends that you contact support to resolve this issue.
.NET Agent >= 20.3 supports .NET Core. If you used the Microservice Agent to monitor .NET Core applications you can monitor .NET Core with the full .NET Agent. You may receive an error message in the MSI Installer stating that another version of AppDynamics is detected.
The Microservice Agent uses a JSON file to store configuration information while the .NET Agent uses an XML file. The data does not migrate between these files.
To fix this issue, you need to map the data in the JSON file to the XML file, config.xml and remove environment variables. If you have completed the instructions above and still see the error, you may need to reboot your machine. You may want to plan reboots according to your planned outage schedule.
Known Issues
You may ignore the following error from the AppDynamics.Agent.Coordinator service in the agent.log or warn.log:
2015-12-01 10:12:03.0435 3872 AppDynamics.Coordinator 1 7 Warn MaxQueueItemAgePolicy MaxQueueItemAge is beyond the integer limit: 13093467123