Download PDF
Download page Install Agent-Side Components.
Install Agent-Side Components
This page describes how to configure Analytics components to collect business transaction data.
In most Analytics deployment scenarios, you must enable the Analytics Agent-side components. The agents are distributed as system-based operations or standalone bundles in the AppDynamics Downloads Portal.
If your app server agent supports Agentless Analytics, such as the Java Agent >= 4.5.15, and .NET Agent >= 20.10, you do not need to install the standalone Analytics Agent or Machine Agent extension for Transaction Analytics data collection. See Deploy Analytics Without the Analytics Agent.
Prepare to Enable the Agents
Review the deployment options, agent-side component architecture, and components you will need to install in Deploy Analytics With the Analytics Agent.
Analytics Agent
The Analytics Agent collects and sends data from the AppDynamics App Agent and log files to the Events Service. The Analytics Agent is not enabled by default. You need to download and enable the desired bundle using a method of your choice.
To use Analytics:
- Obtain a separate Analytics license. See Analytics Licenses.
- Enable the Analytics Agent.
- Point to the Event Service. See Revise the Analytics Agent Properties File for agent-specific configuration and Event Service Deployment for the Event Service.
- Enable Analytics on the Controller.
AppDynamics App Agent
To access Analytics and collect transaction data from an application, you must deploy a supported app server agent version in all environments, such as the Node.js Agent or the PHP Agent. If you already use AppDynamics APM, agents may already be installed in your environment.
Install the Standalone Analytics Agent on Windows
As described in Analytics Deployment Options, the Analytics Agent can run on the same host or on a different host from the app server agent, depending on your use case.
The AppDynamics Downloads Portal provides the following distribution archives:
- Standalone Analytics Agent (no JRE)
- Analytics Agent with JRE 1.8 for both 32-bit and 64-bit Windows machines
Important
Ensure that only the administrators can modify the Analytics Agent directory. Run the following command in the <analytics-agent-home> directory to provide administrator access.
icacls . /inheritance:r /grant Users:(OI)(CI)RX /grant Administrators:(OI)(CI)FRevise the Analytics Agent Properties File
The Analytics Agent properties file determine how your Analytics Agent communicate with other components, what type of data it gathers from the monitored application, and how the components of the Analytics deployment and the Controller authenticate to each other.
Modify the default configuration and set the desired values for the agent properties in the properties file. The location of this file depends on your exact deployment scenario.
Open the
<analytics-agent-home>/conf/analytics-agent.propertiesfile with a text editor. The Analytics Agent on Windows requires double backslash for paths.
For example:conf.dir=C:\\AppD\\analytics-agent\\conf ad.dw.log.path=C:\\AppD\\analytics-agent\\logsCODE- To run the Analytics Agent as a Windows service, modify the following properties:
ad.dw.log.path=<analytics-agent-home>\\logsconf.dir=<analytics-agent-home>\\conf- ad.jvm.options.name=analytics-agent.vmoptions
ad.jvm.heap.min=512mad.jvm.heap.max=1g
- Follow the instructions to enable the standalone Analytics Agent.
To install the Analytics Agent on Windows, run the
installcommand:bin\analytics-agent.exe service-installCODE
Start and Stop the Analytics Agent
To start/stop the Analytics Agent on Windows, run the following commands in the Windows Services menu.
To start the agent, run:
bin\analytics-agent.exe service-startTo stop the agent, run:
bin\analytics-agent.exe service-stopUninstall the Analytics Agent
To uninstall the Analytics Agent, run the .exe file with the uninstall command:
bin\analytics-agent.exe service-uninstallEnable Analytics Agent for a Local App Server Agent
This section assumes that you are installing the Analytics Agent on the same host as your app server agent.
In this deployment, the Analytics Agent reads and transmits log data in log files from the local machine. The app server agent transmits data from the monitored application to the Analytics Agent.

Install the Analytics Agent with the .exe and analytics-agent.exe files found in the <analytics-agent-home>/bin directory. Because the Analytics Agent is written in Java, you will run the agent in a Java Virtual Machine (JVM). The Analytics Agent runs as a Windows service.
Enable the App Server Agent for a Remote Analytics Agent
To specify the location of the remote Analytics Agent with an environment variable named appdynamics.analytics.agent.url on Windows:
- On your Windows machine, go to System Properties > Advanced system settings > Environment Variables.
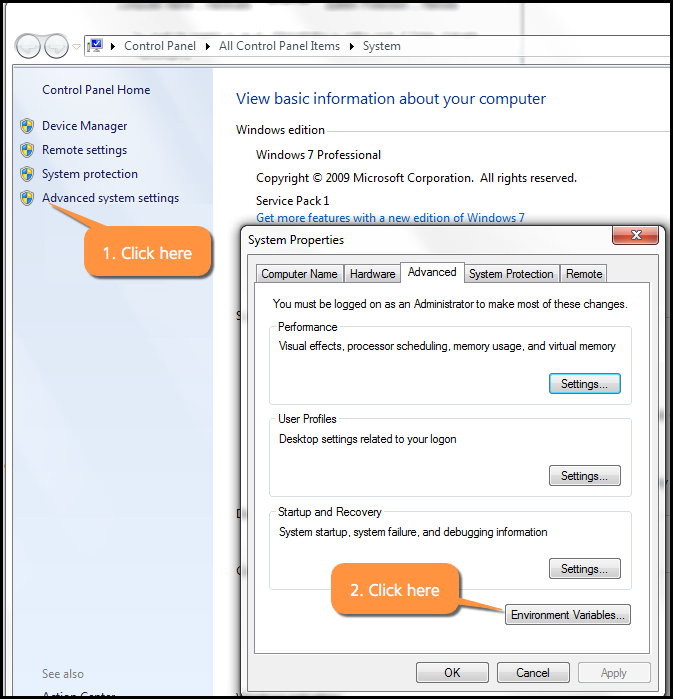
- Under System Variables, click New. AppDynamics recommends a system environment variable approach as opposed to a user environment variable approach; in the environment variable approach, a user must have the same permissions as the user with all the instrumented applications running.
- Set the value for the
appdynamics.analytics.agent.urlsystem variable tohttp://<analytics-agent-ip>:9090/v2/sinks/bt.
Replace<analytics-agent-ip>with the hostname of the Analytics Agent for your environment.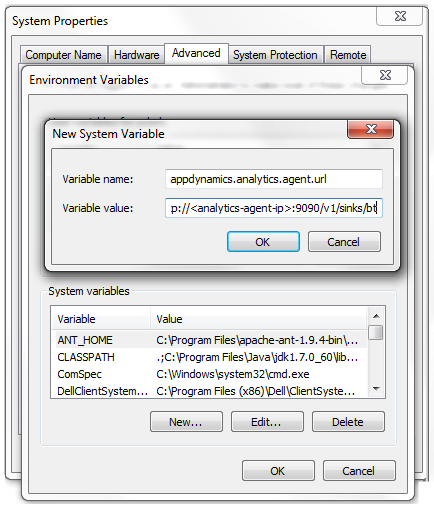
- Restart the applicable application or process where you want the new environment variables to take effect. While it is not required that you restart your machine, the parent process that invokes the monitored process must be restarted. For
w3wpon Windows, restart IIS by runningiisresetafter the changes are made to the environment variables.
Install the Standalone Analytics Agent on Linux
As described in Analytics Deployment Options, the Analytics Agent can run on the same host or on a different host from the app server agent, depending on your use case.
The AppDynamics Downloads Portal provide this distribution archive: Standalone Analytics Agent (no JRE).
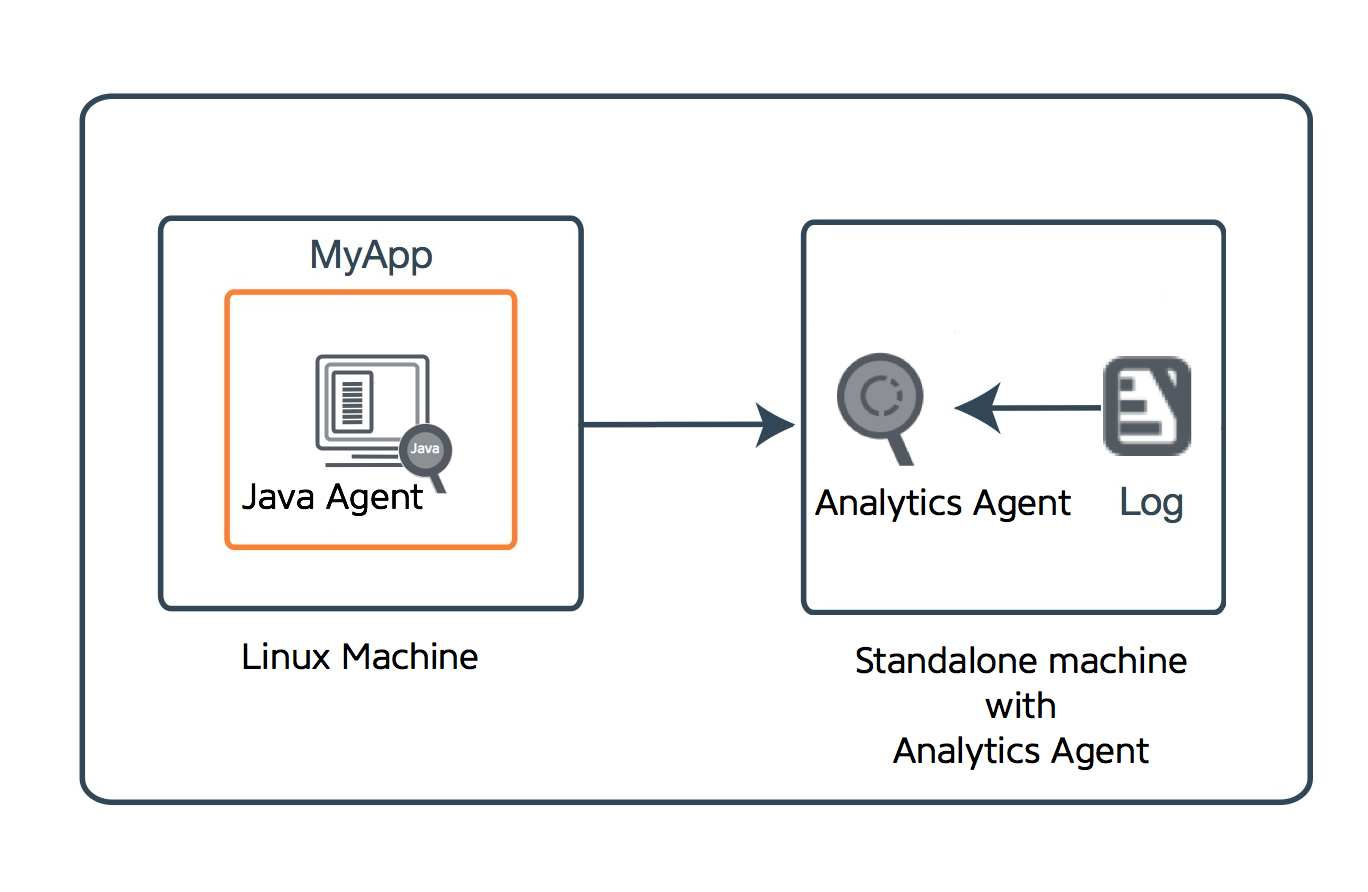
The default settings of the app server agent typically assume that the Analytics Agent is on the same host and uses the default port. If your Analytics Agent is on a host separate from the app server agent, as shown in the diagram below, or you have changed the default port, you need to specify the new host and port values for the app server agent.
Revise the Analytics Agent Properties File
The Analytics Agent properties file determine how your Analytics Agent communicate with other components, what type of data it gathers from the monitored application, and how the components of the Analytics deployment and the Controller authenticate to each other.
Modify the default configuration and set the desired values for the agent properties in the properties file. The location of this file depends on your exact deployment scenario.
Open the
<analytics-agent-home>/conf/analytics-agent.propertiesfile with a text editor.Follow the instructions to enable the standalone Analytics Agent.
Start and Stop the Analytics Agent
You can start and stop the Analytics Agent directly in the command line.
To start the agent, run:
<analytics agent executable> startTo stop the agent, run:
<analytics agent executable> stopRun the Analytics Agent From a Read-Only Filesystem
In this deployment, the Analytics Agent is installed and run from a read-only filesystem. To do so, you need to direct the Analytics Agent to write its log files to a writable partition.
By creating a directory for the Analytics Agent in a writable file system and symlinks for the content of the Analytics Agent in the read-only file system, you will have a writable top-level directory for the Analytics Agent and a writable logs directory under the top-level directory.
To run the Analytics Agent from a separate writable directory using artifacts from a read-only directory:
Provide necessary permissions to the read-only Analytics Agent directory.
# analytics-agent-readonly refers to the read-only analytics agent. chmod -R 555 /tmp/analytics-agent-readonly/CODECreate a directory for the Analytics Agent in a writable file system.
mkdir /tmp/analytics-agent-writable chmod 755 analytics-agent-writable/ cd /tmp/analytics-agent-writableCODECreate symlinks to the contents of the Analytics Agent in the read-only file system.
ln -s /tmp/analytics-agent-readonly/bin/ bin ln -s /tmp/analytics-agent-readonly/lib/ lib ln -s /tmp/analytics-agent-readonly/monitor.xml monitor.xmlCODECreate a writable
confdirectory under that top-level directory.cd /tmp/analytics-agent-writable mkdir conf chmod 755 conf/ cd confCODECreate symlinks to the contents of the
confdirectory.ln -s /tmp/analytics-agent-readonly/conf/analytics-agent.* . ln -s /tmp/analytics-agent-readonly/conf/job/ job ln -s /tmp/analytics-agent-readonly/conf/grok/ grok cd /tmp/analytics-agent-writableCODE- Create logs directory under the
analytics-agent-writabledirectory. Run the Analytics Agent from the
writabledirectory.cd /tmp/analytics-agent-writable nohup bin/analytics-agent.sh start &CODEThe resulting directories look similar to:
/tmp/
dr-xr-xr-x  6 ec2-user ec2-user 4096 Jul 17 20:45 analytics-agent-readonly
drwxr-xr-x  4 ec2-user ec2-user 4096 Jul 26 20:17 analytics-agent-writable

 /tmp/analytics-agent-writable/
total 24
drwxr-xr-x . . . 4096 Jul 27 19:41 .
drwxrwxr-x  . . .  4096 Jul 27 19:37 ..
lrwxrwxrwx 1 . . .   50 Jul 27 19:38 bin -> /tmp/analytics-agent-readonly/bin/
drwxr-xr-x . . .  4096 Jul 27 19:41 conf
lrwxrwxrwx . . .  50 Jul 27 19:38 lib -> /tmp/analytics-agent-readonly/lib/
drwxrwxr-x . . . 4096 Jul 27 19:41 logs
lrwxrwxrwx . . .   57 Jul 27 19:38 monitor.xml -> /tmp/analytics-agent-readonly/monitor.xml


conf/
total 20
drwxr-xr-x . . . 4096 Jul 27 19:41 .
drwxr-xr-x . . . 4096 Jul 27 19:41 ..
lrwxrwxrwx . . .   77 Jul 27 19:39 analytics-agent.properties -> /tmp/analytics-agent-readonly/conf/analytics-agent.properties
lrwxrwxrwx . . .   76 Jul 27 19:39 analytics-agent.vmoptions -> /tmp/analytics-agent-readonly/conf/analytics-agent.vmoptions
lrwxrwxrwx . . .  56 Jul 27 19:40 grok -> /tmp/analytics-agent-readonly/conf/grok/
lrwxrwxrwx . . .  55 Jul 27 19:39 job -> /tmp/analytics-agent-readonly/conf/job/
drwxrwxr-x . . . 4096 Jul 27 21:32 watermark
CODE
Enable the App Server Agent for a Remote Analytics Agent
For most configurations, install the Analytics Agent on the same machine as the app server agent. In certain setups, such as installing an Analytics Agent extension, you will need a separate machine.
Specify the location of the remote Analytics Agent with a
-Dparameter. The argument is passed to the monitored application as follows:-Dappdynamics.analytics.agent.url=http://<analytics-agent-ip>:9090/v2/sinks/btCODEReplace
<analytics-agent-ip>with the hostname of the Analytics Agent for your environment.
Enable the Standalone Analytics Agent
In this deployment, the Analytics Agent and app server agent runs on the same machine. The Analytics Agent reads and transmits log data from log files on the host machine. The app server agent transmits data from the monitored application to the Analytics Agent.

For environments that do not have a Machine Agent installed, install the Analytics Agent as a separate binary, analytics-agent.sh.
- Unzip the Analytics Agent distribution archive to the installation directory on each target host.
When you unzip this archive, you get three directories:bin: contains the binary file for Linux, Solaris, and OSXlib: contains all the jar files that need to be in the classpathconf: contains all the configuration files, such as the properties andvmoptionsfiles
Open the following file to configure connectivity from the Analytics Agent to the Events Service.
<analytics-agent-home>/conf/analytics-agent.propertiesCODEIn the
analytics-agent.propertiesfile, do the following:Change the default URL and, if necessary, the port number to connect the Events Service by modifying the
http.event.endpointvalue.
For example:http.event.endpoint=http://<events_service_host:events_service_port>CODEFor SaaS-based installations, see Analytics in the Cisco AppDynamics SaaS Domains and IP Ranges tables for the host and port for different regions.
If your firewall rules use IP addresses, review firewall considerations in Troubleshoot Analytics Agent Issues. For on-premises installations, use any host and port that you have configured. In clustered environments, this is often a load balancer.
Change the default URL and the port number to point to the Controller by modifying the
ad.controller.urlproperty.
For example:ad.controller.url=http://<application_server_host_name>:<http-listener-port>CODEThis is the URL and the port number you use to access the Controller UI.
The Global Account Name and Access Key values are found under View License in the Controller.

Configure the account and account key for which the agent should publish the business transaction data. Use the Global Account Name and Access Key values you have collected earlier. For example:
# The global_account_name in the Controller for this analytics data, similar to the following: http.event.accountName=<customer1_74678b04-8a71-40ef-acaf-xxxxxxxxxxxx> # Replace this value with the access key of the account name configured above. http.event.accessKey=<3d58aba2-xxx-xxx>CODEThe
http.event.accountNameproperty specifies the Global Account Name of the account. Thehttp.event.accessKeyproperty specifies the Access Key, which provides an authentication mechanism between the Controller and the components of the Analytics deployment. The Controller installation process generates the Access Key value.
For SaaS-based installations, set thehttp.event.nameproperty to Name of the account. The default value iscustomer1. If the property is not configured correctly, the Analytics Agent will not be able to authenticate. The resulting errors are stored in theanalytics-agent.logfile.If you are collecting log information on this host, you need to:
Configure your log sources. See Collect Log Analytics Data.
Update additional properties. See Configure Properties for Consolidated Log Management.
Save and close the file.
Start the Analytics Agent by running the following command.
bin\analytics-agent.sh startCODE
Enable the Analytics Agent as an Extension to the Standalone Machine Agent
This section describes how to configure the Analytics Agent as an extension to the Standalone Machine Agent and run as a Machine Agent monitor.
The AppDynamics Downloads Portal provides these distribution archives:
- Machine Agent Bundle - 64-bit osx (zip)
- Machine Agent Bundle - for both 32-bit and 64-bit Linux machines (rpm)
- Machine Agent Bundle - for both 32-bit and 64-bit Linux machines (zip)
- Machine Agent Bundle - for 64-bit solaris (zip)
- Machine Agent Bundle - for 64-bit solaris-sparcv9 (zip)
- Machine Agent Bundle - for 64-bit solaris-x64 (zip)
- Machine Agent Bundle - for both 32-bit and 64-bit Windows machines (zip)
If the Machine Agent and app server agent are running on the same machine, installing a standalone Analytics Agent is not necessary. In environments with the standalone Machine Agent already running, you can enable and run the Analytics Agent as an extension.

Confirm that JRE >= 8 is installed on the host running the standalone Machine Agent. If the required version of JRE is not available on the host, then the Analytics Agent cannot be enabled.
On the host running the standalone Machine Agent, open
<machine-agent-home>/monitors/analytics-agent/monitor.xmlwith a text editor.Set the enabled tag to
trueand save the file when you are finished.<monitor> <name>AppDynamics Analytics Agent</name> <type>managed</type> <!-- Enabling this requires JRE 8 or higher --> <enabled>true</enabled> ...CODEOpen the following file to configure connectivity from the Analytics Agent to the Events Service:
<machine-agent-home>/monitors/analytics-agent/conf/analytics-agent.propertiesCODEFollow the instructions to enable the standalone Analytics Agent.
If the Machine Agent is already running at this point, restart it to pick up the changes in the configuration.
To connect to the Events Service through a proxy server, see Connect the Agent to the Events Service through a Proxy.
Tune Analytics Agent
This section describes the post-installation configuration of the Analytics Agent: configuring Analytics Agent to connect to an Event Service with a proxy server, collecting log files using Consolidated Log Management (CLM), setting resource usage limit, and changing JVM options.
Connect to the Events Service through a Proxy
If the Analytics Agent needs to connect to the Events Service through a proxy server:
- Open
<analytics-agent-home>\conf\analytics-agent.propertieswith a text editor. Add this information:
# optional proxy properties http.event.proxyHost=<your proxy host> http.event.proxyPort=<your proxy port> http.event.proxyUsername=<your proxy username, if authentication is required> http.event.proxyPassword=<your proxy password, if authentication is required>CODESave and close the file.
Configure Analytics Agent for Consolidated Log Management
If you want your Analytics Agent to work with CLM you need to configure a few properties in the Analytics Agent properties file.
Provide the Controller URL, customer name, and name of your Analytics Agent in the analytics-agent.properties file. The customer name is found under View License in the Controller.
If you are using CLM to configure your log files with source rules, you will need to provide these properties with the correct values.

The default values are the following:
# Format should be http://<host>:<port>
ad.controller.url=http://localhost:8090

# The customer name field from the AppDynamics license page.
http.event.name=customer1

# This is the friendly agent name that will show up in the controller when the agent registers and syncs configuration.
ad.agent.name=analytics-agent1Change Java Virtual Machine Options
If you need to change any JVM startup options, modify <analytics-agent-home>/conf/analytics-agent.vmoptions with a text editor.
The vmoptions file name is read from the ad.jvm.options.name=analytics-agent.vmoptions properties file. If you change the vmoptions file name, you will need to change the ad.jvm.options.name property as well.
If the Analytics Agent Windows service is installed and you need to change the properties file or the vmoptions file, you need to uninstall the service and reinstall it for the changes to take effect.
Configure Resource Usage Limit
To limit resource usage, you can enable the default limit on the number of job for a single Analytics Agent.
This limit can be overridden but is not recommended without a thorough understanding of the potential impact on resource usages, such as CPU usage, disk, and network I/O.
The property is ad.max.enabled.jobs and is found in the <analytics-agent-home>/conf/analytics-agent.properties file. By default, ad.max.enabled.jobs is set to 20.
Verify Analytics Agent Status
To verify that the Analytics Agent has started, look for the following entry in the App Agent log file: Started [Analytics] collector.
To connect to the Events Service through a proxy server, see Connect the Agent to the Events Service through a Proxy.
Troubleshooting Tips
- Ensure that the properties in
analytics-agent.propertiesare properly set. See Enabled Job Files Limit. - JRE version is >= 1.7 and the
JAVA_HOMEvariable is set in the environment. - All properties in
analytics-agent/conf/analytics-agent.vmoptionsare compatible with the JRE.