Download PDF
Download page Field Extraction for Source Rules.
Field Extraction for Source Rules
This page describes how to use Auto and Manual Field Extraction to configure Log Analytics source rules. Field Extraction uses regular expressions to identify and format the fields for your Log Analytics data.
Auto Field Extraction enables you to upload a sample log file and select fields for extraction. The necessary regular expressions are automatically generated and highlighted in your sample messages. You can fine-tune the generated regular expressions using Refiner Sample and Counter Sample log messages.
Manual Field Extraction enables you to upload a sample log file and enter your own regular expressions to define fields and associate the fields with a data type.
Definitions
- Source Rule: a set of configuration settings for extracting analytics data from log files. You create source rules using the Centralized Log Management UI in the Controller. Source rules are stored in the Controller data store and periodically synced with the Analytics Agent. See Configure Log Analytics Using Source Rules.
- Sample File: a representative log file uploaded to the Controller that provides a way to test and fine-tune your log file source rules.
- Definer Sample: a specific log message selected from the sample log file used to define the fields that you want to extract from the log messages.
- Refiner Sample: an additional log message used to revise the auto-generated regular expression created in the Definer Sample step. The Refiner sample helps capture fields that were missed in the initial step.
- Counter Sample: an additional log message used to eliminate false positives while extracting the fields as defined in the Definer or Refiner steps.
Auto Field Extraction
This section describes how to use Auto Field Extraction to extract fields from your log files.
To specify field extraction using a Definer Sample log message:
- Using the Centralized Log Management UI, add a new source rule (or edit an existing source rule), and navigate to the Auto Field Extraction subtab within the Field Extraction tab. See the section "Create a Source Rule" in Configure Log Analytics Using Source Rules for detailed steps on accessing this UI.
- If you do not see log messages in the grid, upload a sample file by clicking Upload Sample File.
If you uploaded a sample file in a previous step in the configuration process or you started your new source rule using an existing source rule, you will see log messages in the grid. - Hover over any row on the grid and click +Select as Definer Sample.
Choose a sample log message that contains the fields you want to extract from the log file. When you need to capture fields from dissimilar log messages, you can create more than one definer. - After you select the Definer Sample message, use the following steps to extract fields from the message. After selecting the Definer Sample and specifying the fields to extract, the preview grid displays rows with matching and non-matching results.
- Select text in the message. If you are defining key-value pairs, it is only necessary to highlight the key field.
A popup appears where you can specify properties of the extracted field. - Enter the field name, select the data type, and click Extract.
The preview grid is updated to show matching rows with the selected text highlighted with a color. - (Optional) To update the properties or delete the field, click the field you just created in the definer and the properties popup appears.
- Repeat steps a, b and c to create more fields.
As you add additional fields, the regular expression changes. You can view or copy (but not edit) the regular expression in the regular expression section.
- Select text in the message. If you are defining key-value pairs, it is only necessary to highlight the key field.
- (Optional) Specify Refiner Samples: As you review the non-matching rows, if you notice a value that was not extracted and should have been extracted, then you can add that row as a Refiner Sample. A refiner sample is used to match the unmatched rows from the Definer step.
- On the grid, click +Select as Refiner Sample. You do not see this option unless you already selected the Definer Sample.
- Select the text.
- A popup appears. You can associate this portion of text with a field already created in the Definer step. When you extract, the regular expression changes and matching rows get updated in the Preview grid and will be shown as Matching. If necessary, you can add more than one Refiner Sample message.
- (Optional) Specify Counter Samples: Counter samples eliminate false positives while extracting the fields. In the Preview grid, the highlighted values are shown along with an X button. Click the X next to a field to mark a value as a false positive (a Counter Sample).

The Counter Sample is shown below the Definer and Refiner Samples and the regular expression is updated to show the new set of matching and non-matching rows.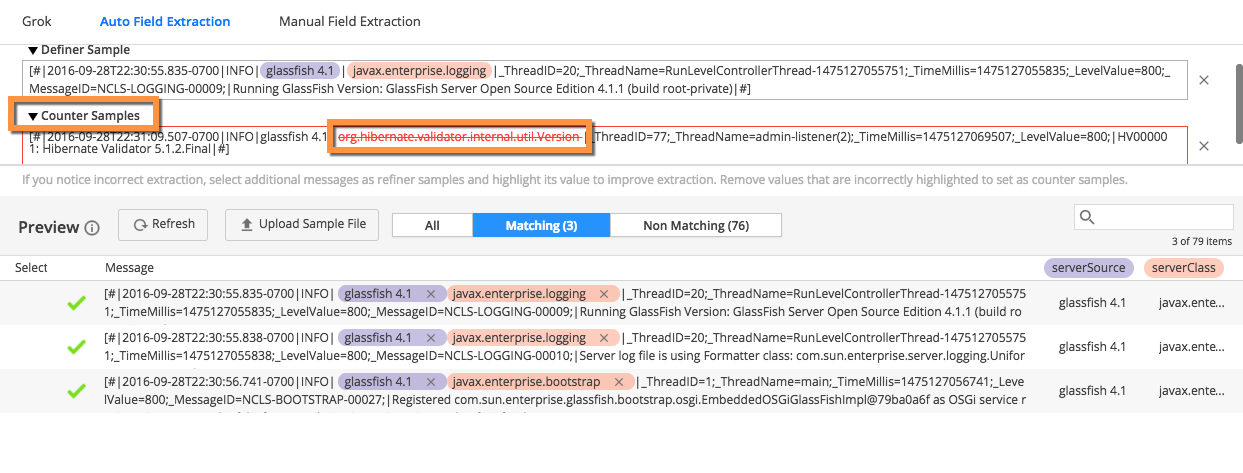
- Click Save to save the fields to the source rule.
- Continue to the other tabs of the Add Source Rule dialog to complete your source rule configuration.
Manual Field Extraction
You can specify your own regular expressions if needed using Manual Field Extraction.
- Using the Centralized Log Management UI, add a new source rule (or edit an existing source rule), and navigate to the Manual Field Extraction subtab within the Field Extraction tab. See "Create a Source Rule" in Configure Log Analytics Using Source Rules for detailed steps on accessing this UI.
- If you do not see log messages in the grid, upload a sample file by clicking Upload Sample File.
- Click Add Field.
- Click Show Example to review how to write regular expressions.
- Type in your regular expression and associate it with a field type using the drop-down menu.
- In the Preview grid, click Refresh.
The preview grid is highlighted with the results of applying the regular expression to the sample log messages. You cannot add more than 20 fields. - (Optional) You can change the regular expression or the type and use Refresh to see the updated results.
- Click Save to update your source rule.