Download PDF
Download page Configure Multiple Business Application Support for .NET.
Configure Multiple Business Application Support for .NET
By default, applications on a single Windows host are mapped to a single business application in the Controller. If needed, you can manually configure the .NET Agent to map different applications on the same Windows host to different business applications in the Controller.
To map applications on a single host to a different business application, you must edit the config.xml file manually. The AppDynamics Agent Configuration utility does not offer this configuration option.
After configuring multiple application support, you cannot use the configuration utility to make configuration changes afterward. If you launch the configuration utility on a server where you configured multiple application support, the utility prompts you to delete the configurations.
Prepare to Configure Multiple Business Applications
Before you configure the .NET Agent, you must install the agent. Use the AppDynamics Agent Configuration utility to perform basic configuration tasks.
Identify how to organize your business applications and identify the business application names.
For example, consider a Windows host running IIS. The IIS instance serves two applications for two separate customers: Ticket Search and Travel Search. The applications perform similar functions, but it makes sense to monitor them separately because they function independently. In this case, create two business applications based upon the application name: Ticket Search Engine and Travel Search Engine.
- Map your IIS applications or application pools, Windows services, and standalone applications to tiers in the different business applications.
For example, map the TicketSearch site to the Ticket Search Web tier in the Ticket Search Engine business application. Map the TravelSearch site to the Travel Search Web tier in the Travel Search Engine business application.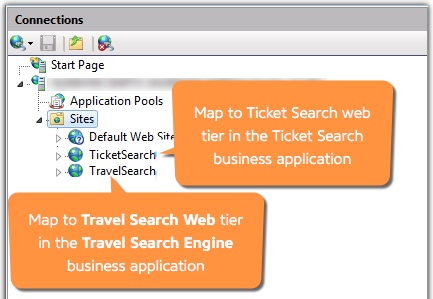
- If you have not already done so, install the .NET Agent. See Install the .NET Agent for Windows.
- Run the AppDynamics Agent Configuration utility to generate a config.xml and configure the Controller connection. See Configure the .NET Agent.
When prompted, select Manual for the method of tier generation and assignment.

The configuration utility only supports mapping one business application per server.
Manually Configure the .NET Agent
Once you have configured the Controller properties for the .NET Agent, instrument your .NET Applications in the config.xml.
Open the
config.xmlfile as administrator and edit the file. See 'Where to Configure Agent Properties' on Administer the .NET Agent.Copy the
controller applicationsblock and paste it as a child element of thecontrollerelement. Replace any existing<applications>or<application>elements:<!--Configure multiple business applications--> <applications> <application name="ApplicationName1" default ="true"/> <application name="ApplicationName2"/> </applications>CODEAdd an
applicationelement for each of the business applications in the Controller.- Edit the
nameattribute for theapplicationelements to match the business application names in the Controller. If the application does not exist, the Controller creates it. - Set the
defaultattribute totruefor oneapplicationelement. If the agent cannot find a match for the business application name in the IIS application, Windows service, or standalone application configuration, the tier reports to the default business application.
In this example,
Ticket Searchis the default business application:<?xml version="1.0" encoding="utf-8"?> <appdynamics-agent xmlns:xsi="http://www.w3.org/2001/XMLSchema-instance" xmlns:xsd="http://www.w3.org/2001/XMLSchema"> <controller host="mycontroller.mycompany.com" port="8090" ssl="false"> <account name="customer1" password="changeme" /> <!--Configure multiple business applications--> <applications> <application name="Ticket Search" default ="true"/> <application name="Travel Search"/> </applications> </controller> ...CODE- Edit the
Add configuration elements for the IIS applications or application pools, Windows services, or standalone applications to instrument.
For IIS applications, add theapplicationsblock as a child of theIISelement. Replace the existingapplicationselement. See IIS Applications Element.<applications> <application path="/" site="FirstSite" controller-application="Application1"> <tier name="FirstSite Tier"/> </application> <application path="/" site="SecondSite" controller-application="Application2"> <tier name="SecondSite Tier"/> </application> </applications>CODEFor IIS application pools, add the
application poolsblock as a child of theIISelement. Replace the existing<application-pools>element. See IIS Application Pools Element.<application-pools> <application-pool name="MyAppPool1" controller-application="Application1"> <tier name="App1 AppPool Tier"/> </application-pool> <application-pool name="MyAppPool2" controller-application="Application2"> <tier name="App2 AppPool Tier"/> </application-pool> </application-pools>CODEFor Windows services or standalone applications, add the
standalone-applicationsblock as a child of theapp-agentselement. See Standalone Applications Element.<standalone-applications> <standalone-application executable="MyStandaloneApp.exe" controller-application="ApplicationName1"> <tier name="Standalone App Tier"/> </standalone-application> <standalone-application executable="MyWindowsService.exe" command-line="-x" controller-application="ApplicationName2"> <tier name="Windows Service Tier"/> </standalone-application> </standalone-applications>CODE- Configure your application elements:
- Add the corresponding element for each IIS application or application pool, Windows service, or standalone application to instrument. See .NET Agent Configuration Properties.
- For each application element set the
controller-applicationattribute to the name of the corresponding business application. If you omit the controller-application attribute, the agent adds the application to a tier in the configured default business application.
- Set the
tierelementnameattribute to the business application tier name.
- After you complete configuration, save the changes to the
config.xmlfile. - Restart the
AppDynamics.Agent.Coordinatorservice. - Restart IIS applications or application pools, Windows services, and standalone applications.
- As your applications begin processing traffic, the agent registers them with the Controller. Log on to the Controller to see that your applications have registered with the corresponding business application.
Sample Configuration
This sample config.xml file demonstrates configuration for multiple business applications in the Controller. Because the Windows service TicketService does not specify a controller-application attribute, it reports to the default business application, Ticket Search Engine. All applications in the TravelAPIPool pool report to the Travel Search Engine.
<?xml version="1.0" encoding="utf-8"?>
<appdynamics-agent xmlns:xsi="http://www.w3.org/2001/XMLSchema-instance" xmlns:xsd="http://www.w3.org/2001/XMLSchema">
<controller host="mycontroller.mycompany.com" port="8090" ssl="false">
<!--Configure multiple business applications-->
  <applications>
    <application name="Ticket Search Engine" default ="true"/>
    <application name="Travel Search Engine"/>
  </applications>
</controller>
<machine-agent />
<app-agents>
  <IIS>
    <automatic enabled="false" />
    <application-pools>
      <application-pool name="TravelAPIPool" controller-application="Travel Search Engine">
        <tier name="Travel APIs"/>
      </application-pool>
    </application-pools>
    <applications>
      <application path="/" site="TicketSearch" controller-application="Ticket Search Engine">
        <tier name="Ticket Search Web"/>
      </application>
      <application path="/" site="TravelSearch" controller-application="Travel Search Engine">
        <tier name="Travel Search Web"/>
      </application>
    </applications>
  </IIS>
<standalone-applications>
  <standalone-application executable="StandaloneApp.exe" controller-application="Ticket Search Engine">
    <tier name="Ticket Standalone Tier"/>
  </standalone-application>
  <standalone-application executable="WindowsService.exe" command-line="-x" controller-application="Travel Search Engine">
    <tier name="Travel Windows Service Tier"/> </standalone-application>
  </standalone-applications>
</app-agents>
</appdynamics-agent>Agent Configuration Properties for Multiple Application Support
Multiple business application support includes configuration properties for the .NET Agent. These configuration properties supersede the ones documented in .NET Agent Configuration Properties.
Controller Applications Element
The applications element is a child of the controller element. It is a container element for all controller applications elements that map to business applications in the Controller.
Required Element: <applications>
Controller Application Element
The controller application element is a child of the controller applications element. It indicates the name of the logical business application you see in the Controller. When you have more than one Controller Application element, you must set the default attribute to true for one of them.
Required Element: <application name="MyDotNetApplication" default="true"/>
Application name attribute
Set the application name attribute to the business application name in the Controller. If the application name does not exist, the Controller creates it when the agent registers.
Type: String
Default: None
Required: Yes
Application default attribute
Set the application default attribute to true for one controller application element. Instrumented applications without the controller application attribute register with the default business application in the Controller.
Type: Boolean
Default: false
Required: For one application in multiple application configurations
Controller-Application Attribute
The IIS application, IIS application-pool, windows-service, and standalone-application elements accept the controller-application attribute. Set the value to the controller application element name. If you do not include a controller-application attribute, the application registers with the default business application.
For example, an IIS application:
<application path="/" site="MySite" controller-application="My Business Application">
Type: String
Default: None
Required: No